I still remember the first batch of brownies I made before I really understood decarboxylation. I followed a recipe I found online, skipped the decarb step because I didn’t know what it was, and ended up with a tray of very expensive, very disappointing chocolate squares. Nothing happened. Not even a yawn. That was my expensive introduction to one of the most important — and most misunderstood — steps in the entire edibles process. If you’re making anything from cannabutter to tinctures to infused oils, getting your decarb right is literally the difference between a product that works and one that doesn’t. And if you’ve ever gone down the Reddit rabbit hole on this topic, you know there’s a lot of conflicting advice out there. This guide is my attempt to settle it once and for all, with a comprehensive decarb chart, method comparisons, and the science to back everything up.
- Why Decarboxylation Is Non-Negotiable for Edibles
- The Decarb Temperature and Time Master Chart
- The Oven Method: Step-by-Step with the Details That Actually Matter
- Alternative Decarb Methods: Sous Vide, Mason Jar, and Instant Pot
- Decarbing Trim, Kief, and Different Starting Materials
- Troubleshooting: The Most Common Decarb Mistakes and How to Fix Them
- Storing Decarbed Cannabis to Preserve Potency
- From Decarb to Infusion: What Comes Next
Why Decarboxylation Is Non-Negotiable for Edibles
Raw cannabis flower contains THCA — tetrahydrocannabinolic acid — not THC. THCA is non-intoxicating. The same goes for CBDA versus CBD. Decarboxylation is the chemical reaction that removes the carboxyl group (that extra COOH molecule) from these acidic cannabinoids, converting them into the active forms your body can actually use. Without this step, you’re essentially making very expensive herb tea. This is the foundational concept behind our complete edibles guide, and it’s the reason every serious edibles recipe starts here.
The reaction happens naturally when you smoke or vaporize cannabis — the heat from combustion does the work instantly. But when you’re making edibles, you need to do it deliberately and carefully, because you’re working with much lower, more controlled temperatures over a longer period of time. The goal is to activate the cannabinoids without burning off the terpenes and other compounds that contribute to what researchers call the entourage effect. Our entourage effect deep dive explains why preserving those compounds matters for your final product’s overall experience.
According to research published in PMC (National Center for Biotechnology Information), the decarboxylation of THCA to THC follows predictable kinetic patterns that are directly influenced by temperature. Higher temperatures speed up the conversion but also accelerate terpene loss and cannabinoid degradation — which is exactly why the temperature sweet spot matters so much.
The Decarb Temperature and Time Master Chart
This is the section I wish had existed when I was starting out. One of the biggest sources of confusion in the cannabis community — and I’ve seen this play out endlessly on Reddit’s r/treedibles community — is that different sources give wildly different temperature and time recommendations. Some say 220°F for 45 minutes. Others insist on 250°F for 27 minutes. Both are technically correct, and that’s the key insight: there are multiple valid combinations, each with its own trade-offs.
The lower and slower approach (220°F/40–45 min) is more forgiving and better preserves terpenes, which is why I recommend it for beginners or anyone working with particularly fragrant, terpene-rich strains like Zkittlez or Gelato. The higher and faster approach (250°F/27 min) maximizes THC conversion efficiency but gives you a much tighter margin for error — a few extra minutes and you’re starting to degrade the very cannabinoids you’re trying to activate. For CBD-dominant material, the optimal conversion actually requires slightly different parameters, with some sources suggesting a longer time at lower temperatures to favor CBD conversion over THC.
How to Decarboxylate Weed: Temperature, Time, and Methods
Ingredients
- Cannabis flower or trim
- Parchment paper
- Baking sheet
- Oven thermometer (recommended)
Instructions
- Preheat oven to 220-250°F (105-121°C)
- Break cannabis into small pieces and spread evenly on parchment-lined baking sheet
- Place on middle oven rack for consistent temperature distribution
- Bake for 20-45 minutes depending on desired cannabinoid conversion
- Remove when golden-brown with nutty, earthy aroma
The most important thing to understand about this chart is that your oven’s dial and your oven’s actual internal temperature are often two very different things. Consumer ovens can run 15–25°F hotter or cooler than the set temperature, which is one of the most common reasons people end up with under-decarbed or over-decarbed material. I keep an inexpensive oven thermometer permanently mounted in my oven for exactly this reason. If you find your oven runs hot, dial down the temperature setting accordingly — this is especially critical at the 250°F end of the range where the margin for error is smallest.
The Oven Method: Step-by-Step with the Details That Actually Matter
The oven is the most accessible decarb method for most people, and when done correctly, it produces consistently excellent results. The standard oven method is what I use for probably 80% of my edibles work, and over the years I’ve dialed in a few details that make a real difference.
Start by preheating your oven to your chosen temperature — I personally land on 230°F most often because it’s a nice middle ground — and give it a full 15–20 minutes to stabilize before you put anything in. Ovens cycle through temperature swings as they maintain heat, and you want to catch a stable moment rather than a peak. While it’s preheating, break your cannabis into small, roughly uniform pieces by hand. You don’t want a fine grind here — grinding too finely can cause material to fall through parchment paper and also increases the surface area in a way that can lead to uneven decarbing. Rough, pea-sized pieces are ideal.
Spread the cannabis in a single, even layer on a baking sheet lined with parchment paper. Parchment paper is my preference over aluminum foil because it’s non-reactive and the cannabis doesn’t stick to it, making cleanup and transfer much easier. Place the sheet on the middle rack — and this is genuinely important, not just a suggestion. The middle rack position exists at the geometric center of your oven’s heat distribution zone, which means it receives more consistent, even heat from both the top and bottom elements compared to upper or lower positions. Convection ovens are even more forgiving because the fan actively circulates air, but the middle rack rule still applies.
When your cannabis is done, it should be a golden-brown color — not green, not dark brown, not black. The aroma will shift from fresh and herbal to something more nutty, toasty, and earthy. That smell is actually your best real-time indicator. If it smells like you’re burning it, you probably are. Pull it out, let it cool completely on the pan before handling, and then transfer to an airtight container for storage or immediate use.
One variable that many guides overlook is moisture content. Freshly dried cannabis that hasn’t been fully cured, or material that has been stored in humid conditions, will need a few extra minutes because some of the initial heat energy goes toward evaporating moisture rather than driving the chemical reaction. If you’re working with material that feels at all damp or spongy, add 5–10 minutes to your time, or consider a brief pre-dry in the oven at 200°F for 5 minutes before starting your actual decarb.
Alternative Decarb Methods: Sous Vide, Mason Jar, and Instant Pot
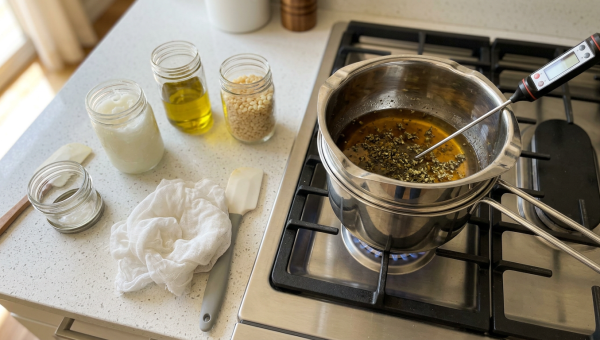
The oven method is great, but it does have one significant drawback: smell. If you’ve ever decarbed in an apartment or a home where discretion matters, you know exactly what I’m talking about. The nutty, earthy aroma that signals a successful decarb is also a very public announcement of what you’re doing. This is where alternative methods shine, and honestly, some of them produce a more consistent result than the oven anyway.
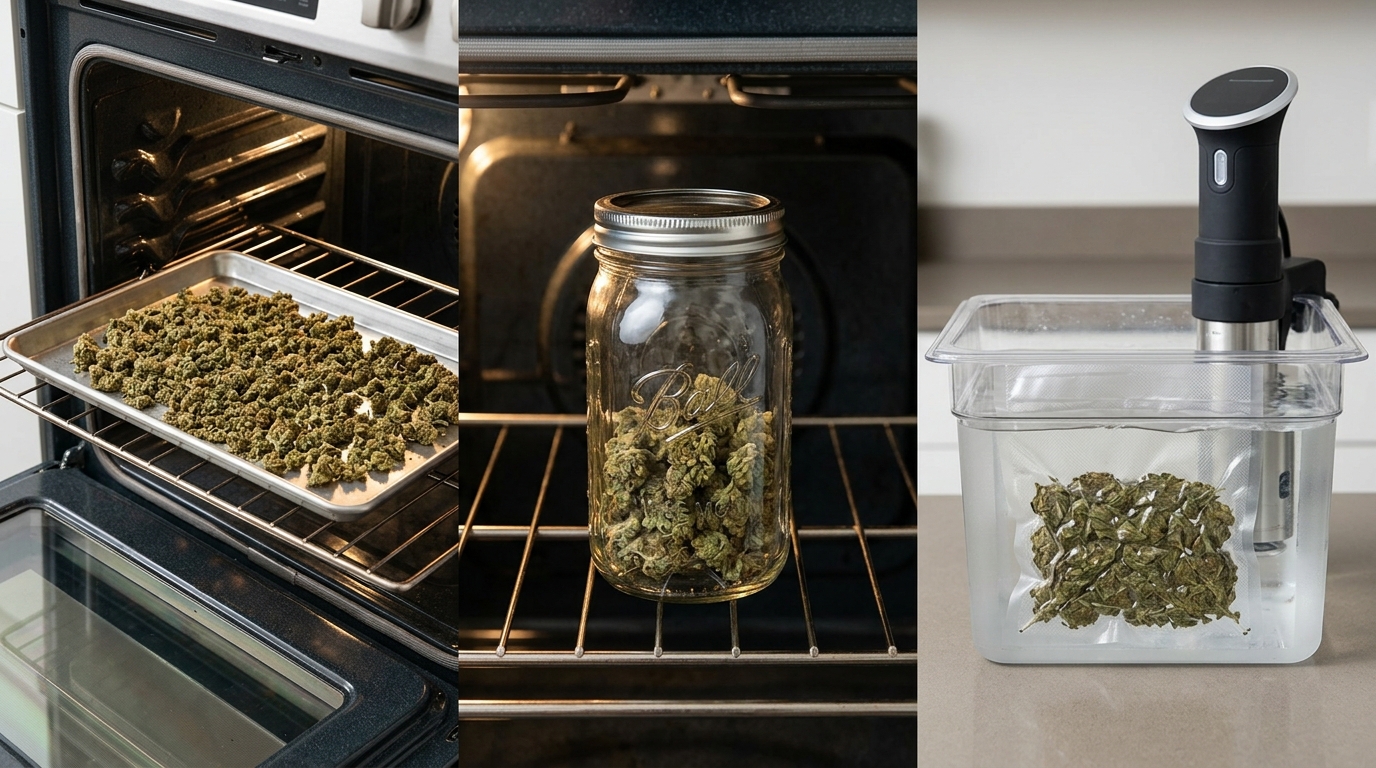
The Sous Vide Method is my personal favorite for precision and odor control. You seal your cannabis in a vacuum-sealed or zip-lock bag (with as much air removed as possible), submerge it in a water bath set to your target temperature, and let it go. Because water conducts heat far more evenly than air, the temperature around your cannabis is perfectly stable — there are no hot spots, no oven cycling, and no smell escaping into your kitchen. The most commonly cited parameters for sous vide decarb are 203°F (95°C) for 90 minutes, which is slightly lower than oven temperatures but compensates with a longer time and the superior heat transfer of water. The trade-off is time — it’s a longer process than the oven — and you need either a sous vide circulator or a very carefully monitored pot of water on the stove. For anyone serious about edibles, a sous vide circulator is one of the best investments you can make.
The Mason Jar Method is a clever hybrid that gives you much of the odor containment of sous vide while using equipment most people already own. You place your cannabis in a mason jar, seal the lid, and put the sealed jar in the oven at your chosen temperature. The jar traps the volatile aromatic compounds inside, dramatically reducing the smell in your kitchen. It also creates a slightly more humid microenvironment inside the jar, which some people find helps with even decarbing. The main downside is that you need to burp the jar carefully when it comes out — open it slowly and away from your face, as pressure can build up. Use oven mitts, let the jar cool for several minutes before opening, and be gentle. I’ve seen people get a face full of very hot, very fragrant steam by rushing this step.
The Instant Pot Method is the one I see gaining the most traction in online communities right now, and for good reason. Using the Instant Pot’s “Keep Warm” function (which holds around 200°F) or the pot-in-pot method with a mason jar placed on the trivet inside the Instant Pot, you can achieve a low-and-slow decarb with excellent odor control. The steam pressure environment helps maintain consistent temperatures, and the sealed lid keeps everything contained. Typical times run 40–60 minutes on the Keep Warm setting. It’s not quite as precise as sous vide, but it’s more accessible and the results are consistently good.
| Method | Temperature | Time | Odor Control | Equipment Needed |
|---|---|---|---|---|
| Oven | 220-250°F (105-121°C) | 20-45 min | Moderate | Baking sheet, parchment paper, oven |
| Sous Vide | 203°F (95°C) | 60 min | Excellent | Vacuum sealer, water bath, thermometer |
| Slow Cooker | Low setting | 90-120 min | Good | Slow cooker, parchment paper |
| Instant Pot | 248°F (120°C) | 40 min | Good | Instant Pot, trivet, water |
| Microwave | Variable | 5-10 min | Poor | Microwave, plate |
| Method | Temperature | Time | Odor Control | Equipment Needed | Best For |
|---|---|---|---|---|---|
| Oven (open pan) | 220–250°F | 25–45 min | Low | Oven, baking sheet, parchment | Beginners; large batches |
| Oven (mason jar) | 220–240°F | 30–45 min | Medium | Oven, mason jar | Odor-conscious home cooks |
| Sous Vide | 203°F (95°C) | 90 min | High | Sous vide circulator or pot, vacuum bags | Precision seekers; apartment dwellers |
| Instant Pot | ~200°F | 40–60 min | High | Instant Pot, mason jar | Convenience; odor control |
| Microwave | Variable | Not recommended | Low | Microwave | Not recommended — uneven heating |
Decarbing Trim, Kief, and Different Starting Materials
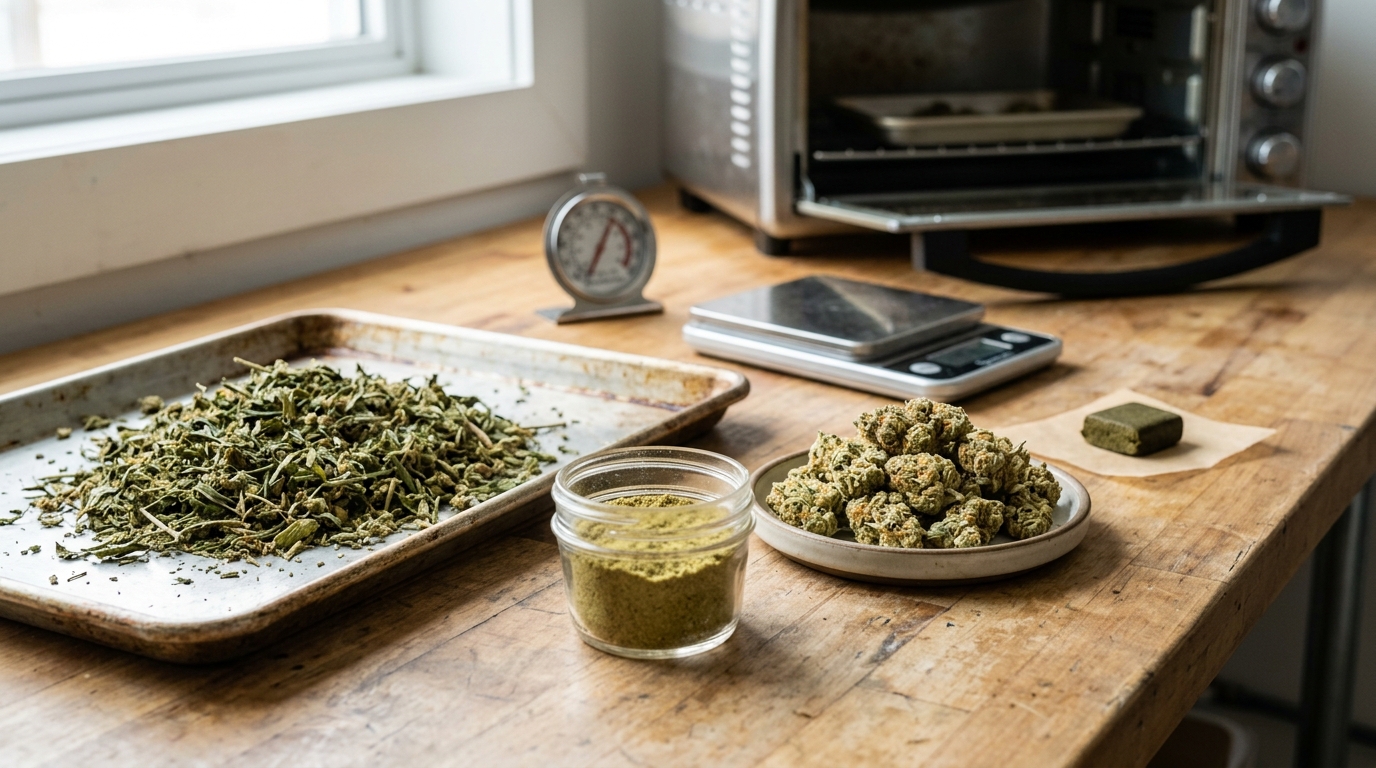
Most decarb guides focus exclusively on whole or broken-up buds, but in reality, a lot of people are working with trim, shake, or kief — and these materials have different requirements. Trim and shake, which contain a mix of small leaf pieces and bud fragments, tend to decarb slightly faster than dense whole buds because of the increased surface area and lower density. I generally reduce my time by about 5 minutes when working with trim, and I watch the color change more carefully since the thinner material can brown quickly.
Kief is a different story entirely. Because kief is essentially concentrated trichomes — the resinous glands that contain the majority of cannabinoids — it’s both more potent and more delicate than flower. The kief guide on this site goes into great detail on what kief actually is, but from a decarb perspective, the key thing to know is that kief needs lower temperatures and shorter times. I decarb kief at 220°F for about 20–25 minutes, pressed into a thin layer between two pieces of parchment paper, and I check it at the 15-minute mark. Over-decarbing kief wastes an extremely concentrated and valuable material, so err on the side of caution.
Hash and concentrates follow similar principles to kief — lower temperatures, shorter times, and much more careful monitoring. If you’re working with these materials, I’d strongly suggest the mason jar or sous vide method for better control.
Troubleshooting: The Most Common Decarb Mistakes and How to Fix Them
After years of making edibles and talking to readers who’ve had everything from mildly disappointing to completely failed batches, I’ve noticed the same mistakes come up again and again. Let me walk through the most common ones so you can avoid them.
Under-decarbing is probably the most common mistake, and it usually comes from one of three causes: an oven that runs cool, cannabis that was too moist, or simply not enough time. The tell-tale sign is material that’s still greenish after the recommended time, or edibles that produce very mild or no effects. If you suspect under-decarbing, you can actually put the material back in the oven for an additional 10–15 minutes — it’s not ideal, but it’s better than wasted product. Going forward, invest in an oven thermometer.
Over-decarbing is less common but more devastating, because you can’t undo it. Over-decarbed cannabis looks dark brown to almost black, smells acrid or burnt rather than nutty, and produces edibles that may have a harsh flavor and reduced potency. THC degrades into CBN (cannabinol) at higher temperatures and longer times, which has its own mild sedative effects but is much less potent than THC. If your cannabis smells burnt, it probably is. The only fix is to start over.
Uneven decarbing happens when some pieces are perfectly done while others are still green. This is almost always a heat distribution issue — either the oven has hot spots, the material wasn’t spread in a single even layer, or the rack position was too close to a heating element. The fix is simple: use the middle rack, spread evenly, and consider rotating the pan halfway through.
Smell complaints are a lifestyle issue rather than a technical one, but they’re real. If you’re in a state where home consumption is legal but you’re concerned about neighbors or housemates, the mason jar or sous vide method will dramatically reduce odor. In states where home cultivation and processing are legal, like California, Colorado, Oregon, and many others, this is simply a matter of courtesy and preference. In states with more restrictive laws, always know your local regulations before processing cannabis at home.
Maya Chen has written extensively about the chemistry of cannabinoid degradation on this site, and her work on terpene science is particularly relevant here — over-decarbing doesn’t just reduce THC, it strips the terpene profile that contributes to the overall character of your edibles. That’s a loss worth taking seriously.
Storing Decarbed Cannabis to Preserve Potency
Once you’ve successfully decarbed your cannabis, proper storage is essential to protect your work. Decarbed material is more vulnerable to degradation than raw flower because the activated THC is more susceptible to oxidation, light exposure, and heat. The same principles that apply to storing regular cannabis — which our guide on cannabis shelf life covers in depth — apply here, but with even greater urgency.
My go-to storage method is an airtight glass jar (a small mason jar works perfectly) stored in a cool, dark location. If I’m not going to use the decarbed material within a week or two, I’ll store it in the refrigerator in a sealed container. For longer-term storage beyond a month, the freezer is an option, though I find that freezing and thawing can introduce moisture if not done carefully. Always let frozen material come fully to room temperature before opening the container, to prevent condensation from forming on the cannabis.
Light is the enemy of decarbed cannabis. UV exposure degrades THC relatively quickly, which is why amber or dark glass jars are preferable to clear ones. If you’re using a clear jar, keep it in a drawer or cabinet rather than on the counter. And keep it away from any heat sources — the top of the refrigerator, near the stove, or on a sunny windowsill are all places I’ve seen people store cannabis and then wonder why their edibles stopped working after a few weeks.
From Decarb to Infusion: What Comes Next
Decarbing is step one, but it’s what you do with that activated cannabis that really determines the quality of your final product. The most common next step is making cannabutter or cannabis oil, which then becomes the base for virtually any edible you want to make. Our cannabutter guide picks up exactly where this article leaves off, walking through the infusion process in detail.
For topicals — balms, salves, and lotions — the decarb step is actually a subject of some debate. Some makers decarb their cannabis before infusing it into carrier oils for topicals, while others argue that CBDA and THCA have their own beneficial properties for skin applications. Our cannabis topicals DIY guide addresses this question directly. For anything you’re going to eat or drink with the intention of feeling effects, though, decarbing is non-negotiable.
Darrel Henderson has noted in his growing guides that the strain you start with matters enormously for your end product — a high-THCA strain like Bruce Banner or Gorilla Glue will produce more potent decarbed material than a lower-THC variety, all other variables being equal. This is worth keeping in mind when you’re planning your infusions and thinking about dosing. Speaking of dosing — microdosing has become one of my favorite approaches to edibles, and it starts with understanding exactly how much activated THC you’re working with, which is why a precise, consistent decarb process is so valuable.
Frequently Asked Questions
What temperature should I decarb weed at in the oven?
The most commonly recommended range is 220–250°F (105–121°C). For beginners, I recommend starting at 220–230°F for 40–45 minutes because it’s more forgiving and preserves more terpenes. More experienced makers sometimes prefer 250°F for 25–27 minutes for faster conversion, but this approach requires a well-calibrated oven and careful timing. Always verify your oven’s actual temperature with an inexpensive oven thermometer, as consumer ovens can run 15–25°F off from the set temperature.
How do I know when my weed is done decarbing?
The two most reliable indicators are color and aroma. Properly decarbed cannabis should shift from its original green color to a golden-brown or light brown color — similar to the color of dried herbs or light toast. The smell will change from fresh and herbal to something more nutty, earthy, and toasty. If it smells burnt or looks dark brown to black, it’s been over-decarbed. If it’s still mostly green and smells like fresh cannabis, it needs more time.
Can I decarb weed in a mason jar instead of directly on a baking sheet?
Yes, and it’s actually a great option for odor control. Place your cannabis in a sealed mason jar and put it in the oven at 220–240°F for 30–45 minutes. The jar traps volatile aromatic compounds, dramatically reducing the smell in your kitchen. When you remove the jar, let it cool for several minutes before carefully opening it — pressure can build inside the jar, and opening it too quickly can release a burst of very hot steam. Use oven mitts and open slowly.
Does decarbing weed smell up your house?
The open oven method produces a noticeable nutty, earthy aroma that will permeate your kitchen and potentially other areas of your home. If odor is a concern, the mason jar oven method, sous vide method, or Instant Pot method all significantly reduce smell. Good ventilation — an exhaust fan, open windows — helps with the oven method. The sous vide method, where cannabis is sealed in a vacuum bag submerged in water, is the most odor-contained option available without specialized equipment.
Do I need to decarb weed before making cannabutter?
Yes, absolutely. Raw cannabis contains THCA, which is non-intoxicating. Without decarboxylation, your cannabutter will not produce psychoactive effects when consumed. Some people skip this step thinking the heat from the butter-making process will do the work, but the temperatures involved in most stovetop infusion methods are not consistently high enough or long enough to ensure full decarboxylation. Always decarb first, then infuse.
Is there a difference between decarbing for THC versus CBD?
Yes, and it’s a meaningful one. THC and CBD have slightly different decarboxylation kinetics. CBD conversion from CBDA generally benefits from slightly lower temperatures and longer times compared to THC conversion. At 220°F, CBD-dominant material may need 60–90 minutes compared to 40–45 minutes for THC-dominant material. If you’re working with a CBD-dominant strain or hemp flower, extend your decarb time and consider using the lower end of the temperature range to maximize CBD conversion without degrading it.
Can you decarb weed in a microwave?
Technically yes, but I don’t recommend it. Microwave heating is notoriously uneven — some spots will be over-decarbed while others remain under-decarbed, and it’s very difficult to control the temperature precisely enough to avoid burning the material. There’s also a significant risk of overheating in spots, which degrades cannabinoids rapidly. The oven method takes only slightly longer and produces dramatically more consistent results. If you’re in a situation where the oven is genuinely not an option, the Instant Pot method is a far better alternative than the microwave.
For more guides on cannabis lifestyle, edibles, growing, and science, explore our cannabis blog — it’s where I share everything I’ve learned about making the most of this plant.