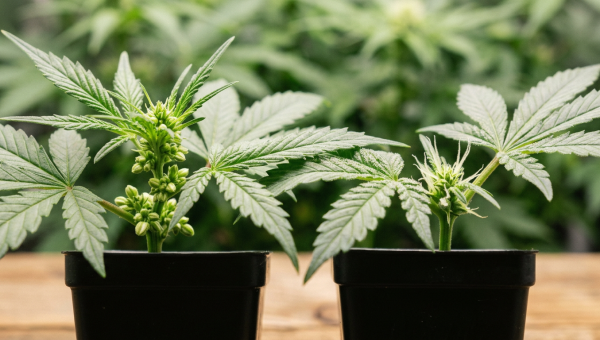
Growing hydroponic weed means cultivating cannabis without soil, feeding your plants directly through a nutrient-rich water solution. Plants grow faster, often 20-30% quicker than soil, and yields can be significantly higher when the system is dialed in. It requires more attention than soil, but the results are hard to argue with.
I still remember the first time I pulled a Deep Water Culture setup out of a closet in my old apartment in Denver. I’d been a carpenter for years before I got serious about growing, so I figured I could build anything. What I couldn’t figure out was why my plants kept looking sad despite perfect-looking numbers on paper. Turns out I had my pH drifting all night because I wasn’t checking it at the right time of day. One small correction, and those plants exploded. That’s hydroponics in a nutshell: tight margins, massive rewards when you get it right.
This guide covers everything you need to grow hydro weed from scratch, whether you’re in California, Colorado, Michigan, or any other state where home cultivation is legal. We’re talking system types, nutrient schedules, pH management, VPD, common mistakes, and strain selection. If you’ve ever been curious about going soilless, this is where you start. You can also browse our cannabis blog for more growing deep-dives alongside this guide.
- What Hydroponic Cannabis Actually Means (And Why It Grows Faster)
- The Three Main Hydroponic Systems: DWC, NFT, and Ebb and Flow
- Essential Equipment for a Hydroponic Cannabis Setup
- Hydroponic Nutrient Basics: What Your Plants Actually Need
- Hydroponic Cannabis Nutrient Schedule: Week by Week
- VPD and Environmental Control in Hydroponic Grows
- Step-by-Step: Setting Up Your First DWC System
- Common Hydroponic Weed Mistakes (And How to Fix Them)
- Best Strains for Hydroponic Growing
- Hydroponic Weed vs Soil: Which Grows Better Cannabis?
- Flushing Hydroponic Cannabis Before Harvest
- Legal Considerations for Home Hydroponic Cannabis Grows in the US
- Advanced Hydroponic Techniques: SCROG, Manifolding, and CO2
- The Bottom Line
What Hydroponic Cannabis Actually Means (And Why It Grows Faster)
Hydroponic cannabis is any cannabis plant grown in a soilless medium where nutrients are delivered directly in water. The roots sit in or are regularly bathed by a nutrient solution, which means the plant never has to work hard to find food. That energy goes straight into biomass, resin production, and terpene development instead.
Soil acts as a buffer. It holds nutrients in organic form, and microbial life has to break those compounds down before roots can absorb them. That process takes time. In hydroponics, nutrients are already dissolved and bioavailable, so uptake is nearly instant. The plant is essentially eating a pre-digested meal every single feeding cycle.
There’s also the oxygen factor. In a well-run hydro system, roots get far more dissolved oxygen than they would buried in compacted soil. According to research published through the National Center for Biotechnology Information, higher dissolved oxygen levels in the root zone directly correlate with faster growth rates and more robust root development in hydroponic crops. That science absolutely applies to cannabis.
The tradeoff is that the same directness that makes hydro so effective also makes it less forgiving. In soil, if your pH drifts a point, the buffer in the growing medium absorbs some of that swing. In a DWC bucket, that same drift hits the roots immediately. You feel every mistake faster. That’s not a reason to avoid hydro; it’s just a reason to stay on top of your numbers.
If you’re newer to growing in general, I’d suggest getting comfortable with the fundamentals first. The complete home growing guide covers the basics of cannabis cultivation that apply across every medium, and it’ll give you a solid foundation before you go soilless.
The Three Main Hydroponic Systems: DWC, NFT, and Ebb and Flow
Deep Water Culture (DWC), Nutrient Film Technique (NFT), and Ebb and Flow (also called flood and drain) are the three systems most commonly used for home cannabis cultivation. Each has a distinct mechanism, a different skill ceiling, and different strengths depending on your grow space, budget, and experience level.
Deep Water Culture (DWC)
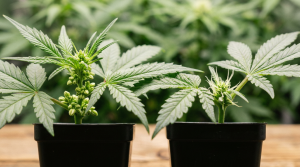
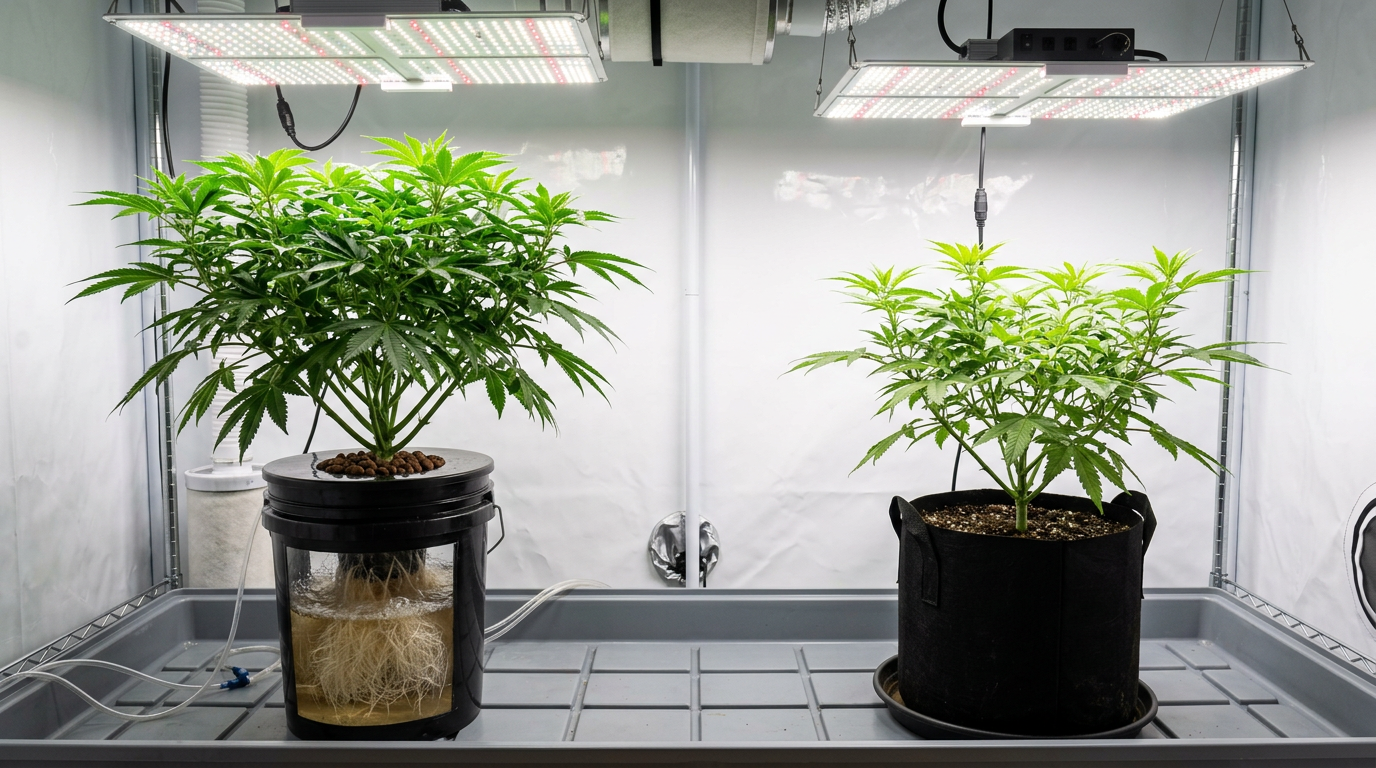
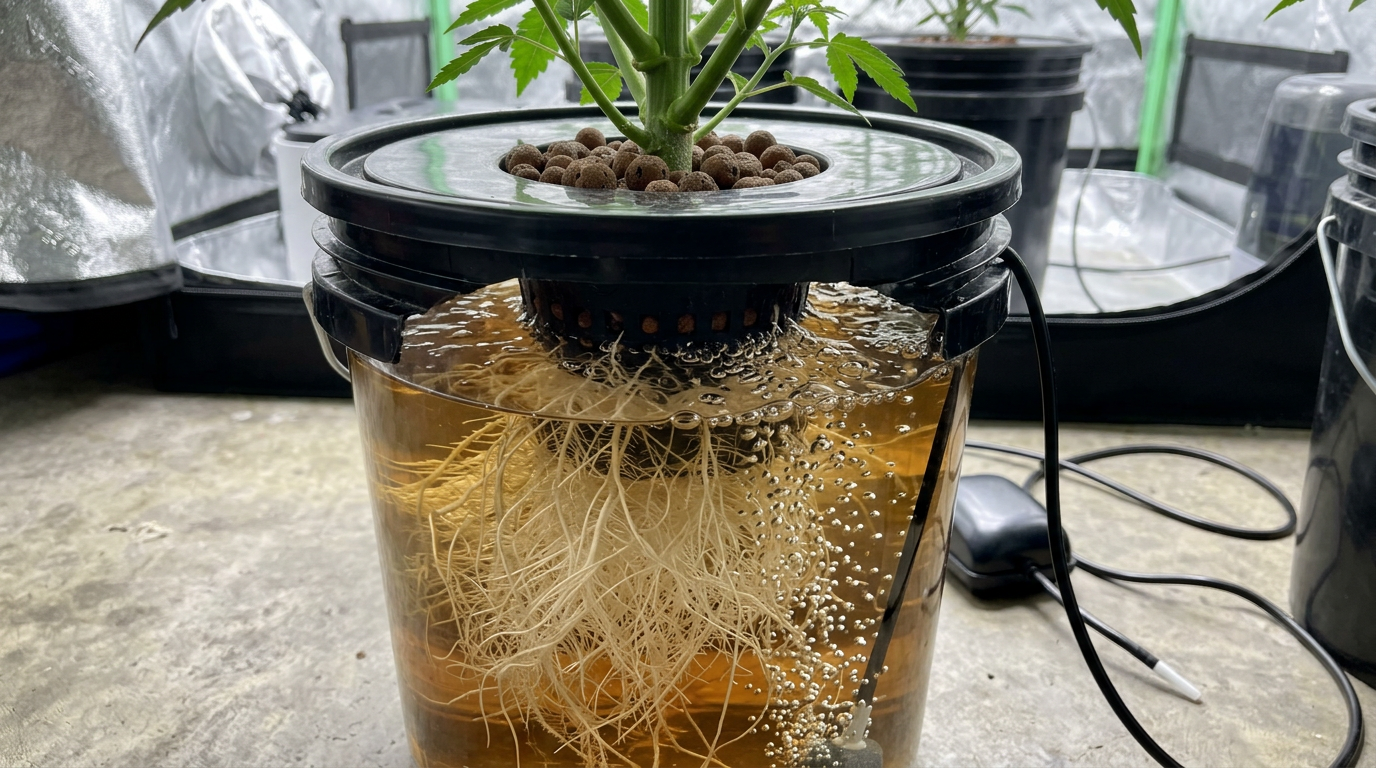
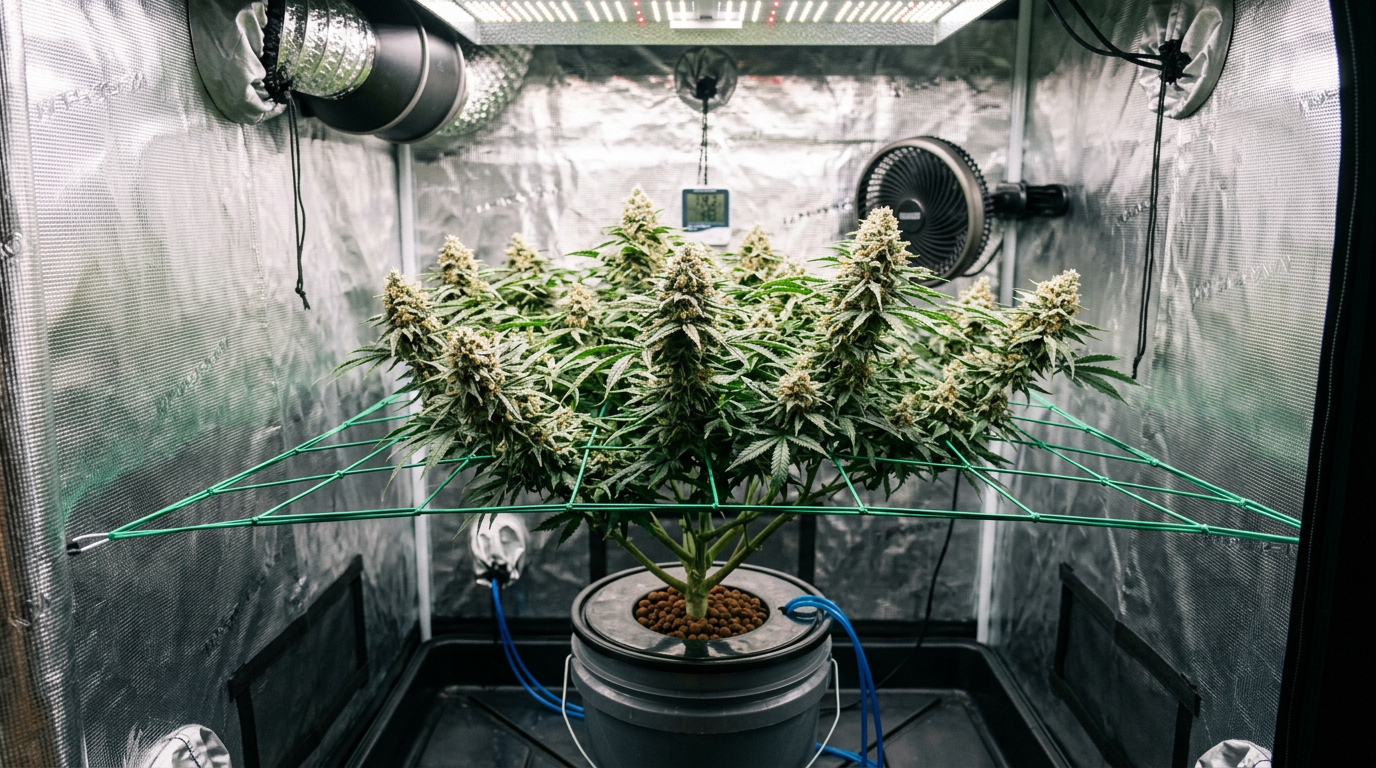
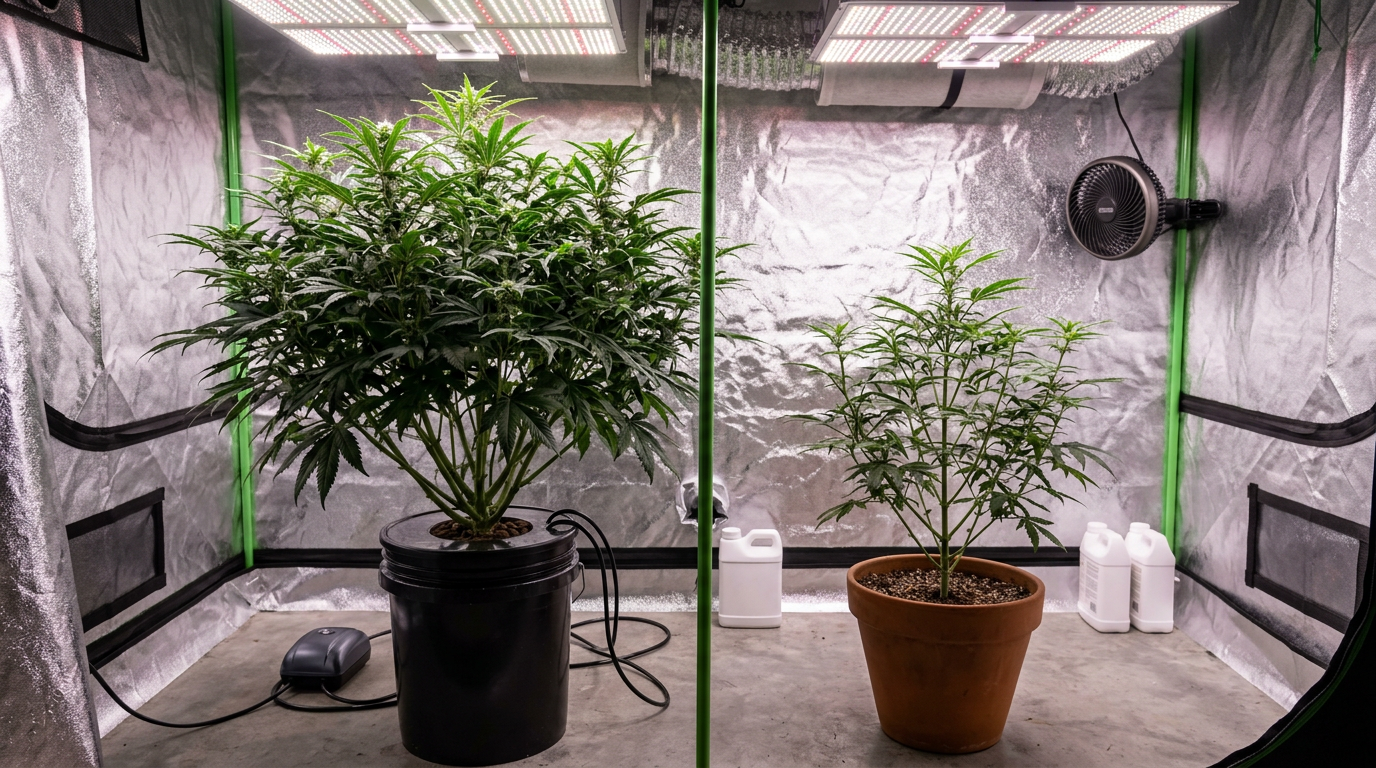
DWC is the most popular hydro method for home cannabis growers, and for good reason. You suspend the plant in a net pot above a reservoir filled with nutrient solution, and an air pump keeps that solution oxygenated around the clock. The roots hang down into the water and absorb nutrients continuously. Setup is cheap, the learning curve is manageable, and the results can be outstanding.
I’ve run DWC more times than I can count. It’s my go-to for pheno hunting because I can run multiple buckets independently and compare plants side by side without one plant’s root system affecting another. The main thing to watch is reservoir temperature. Keep your nutrient solution between 65-68°F (18-20°C). Above 72°F, dissolved oxygen drops and you start inviting root rot, which is the DWC grower’s worst nightmare.
Recirculating DWC (RDWC) takes the concept further by connecting multiple buckets to a central reservoir with a pump. It’s more efficient to manage because you’re adjusting one reservoir instead of five or six individual buckets. The tradeoff is that if one plant gets sick, the pathogen circulates to every other plant in the system. I learned that the hard way with a pythium outbreak that wiped out an entire run of Gorilla Glue in my third year of growing hydro.
Nutrient Film Technique (NFT)
NFT systems pump a thin, continuous film of nutrient solution along the bottom of slightly angled channels. Roots sit in those channels, with the upper portion exposed to air and the lower portion bathing in the flowing solution. The constant movement keeps dissolved oxygen high and nutrient delivery consistent.
NFT is popular in commercial settings because it’s highly scalable and uses very little water compared to reservoir-based systems. For home growers, it works beautifully for smaller plants like autoflowers or for a sea-of-green (SOG) setup. The weakness is that NFT has almost no buffer. If your pump fails for even a few hours, those roots dry out fast. In my experience, you need a reliable backup pump if you’re running NFT with cannabis.
Ebb and Flow (Flood and Drain)
Ebb and flow systems flood a growing tray with nutrient solution on a timer, then drain it back into a reservoir below. The roots experience cycles of wet and dry, which actually encourages aggressive root growth as the plant “reaches” for moisture between floods. It’s a forgiving system compared to NFT because there’s always some residual moisture in the growing medium between flood cycles.
You can use almost any inert growing medium in an ebb and flow setup: clay pebbles (hydroton), rockwool, or even coco coir. This makes it a great bridge system for growers transitioning from soil. I ran an ebb and flow setup for about two years before switching to RDWC, and it taught me a lot about how cannabis roots behave when they have to work slightly harder for water.
| Factor | DWC | NFT | Ebb & Flow | Soil |
|---|---|---|---|---|
| Skill Level | Beginner-Intermediate | Intermediate-Advanced | Beginner-Intermediate | Beginner |
| Setup Cost | $50-$200 | $150-$400 | $100-$300 | $30-$100 |
| Growth Speed | Fastest | Very Fast | Fast | Slowest |
| Forgiveness | Medium | Low | Medium-High | High |
| Yield Potential | Very High | High | High | Medium-High |
| Water Usage | Medium | Low | Medium | High |
| Maintenance | Daily pH/EC checks | Daily + pump monitoring | Timer management | Watering schedule |
| Root Rot Risk | High if temp rises | Medium | Low-Medium | Low |
Essential Equipment for a Hydroponic Cannabis Setup
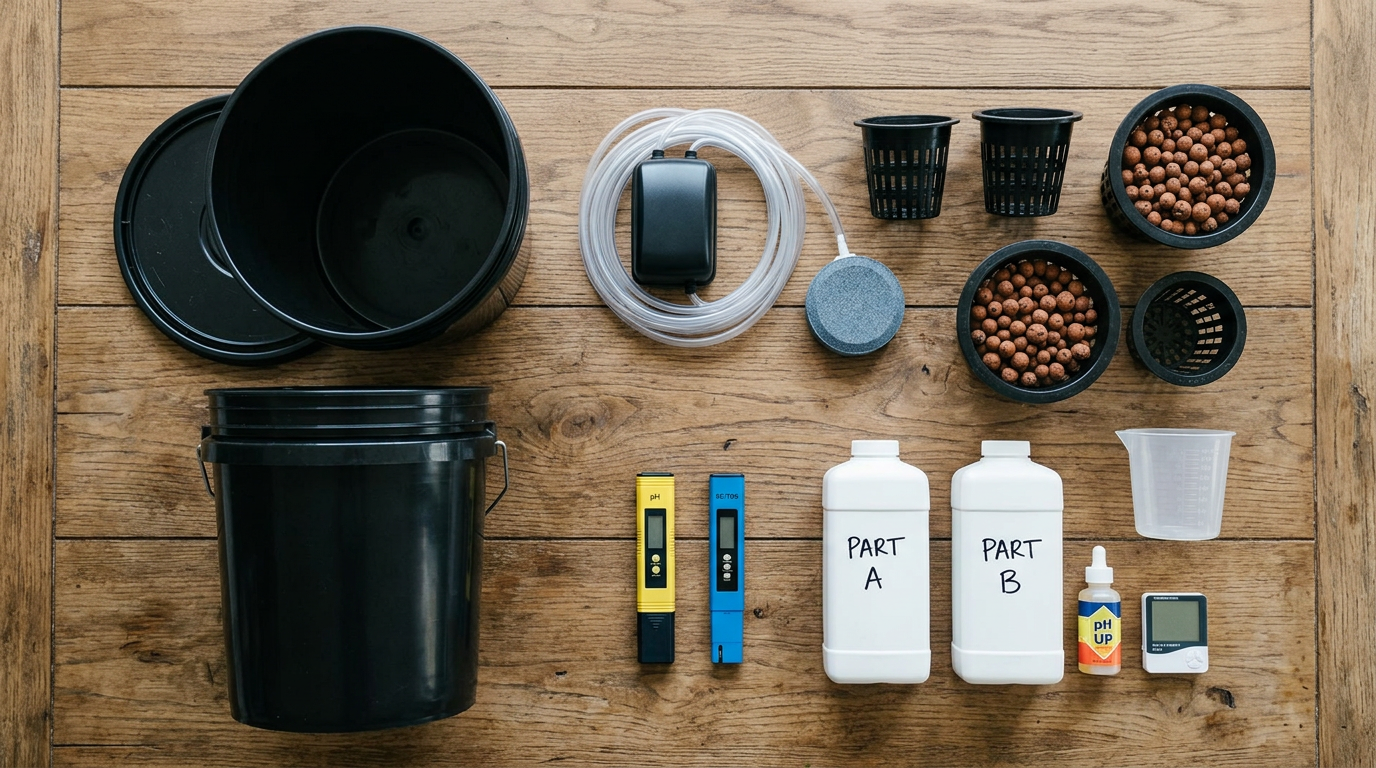
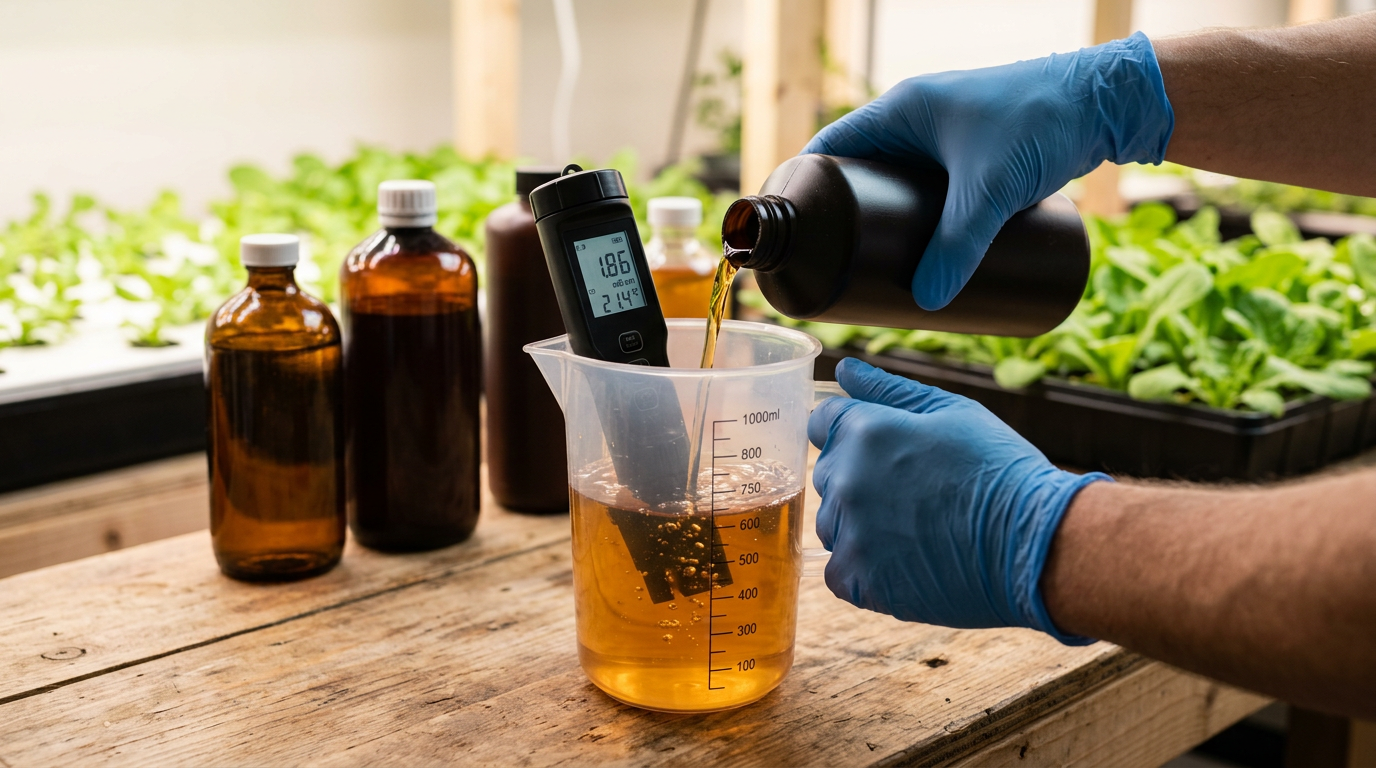
A functional home hydroponic cannabis system requires six core components: a reservoir or growing tray, an air or water pump, an air stone or distribution manifold, net pots, a growing medium, and a nutrient solution. Beyond these, you’ll need a pH meter, an EC/TDS meter, and a thermometer to maintain proper conditions.
Let me break down what actually matters versus what’s marketing fluff, because the hydroponics supply industry loves to sell you expensive gear you don’t need when you’re starting out.
Your pH meter is the single most important tool you own in a hydro setup. A cheap $15 pen meter will drift and give you false readings within weeks. I’ve used a couple of different mid-range meters over the years and settled on the Bluelab Combo Meter for my main grow room. It reads pH, EC, and temperature simultaneously, and the calibration holds reliably. It’s not cheap, but it pays for itself in one saved crop.
Air pumps and air stones are straightforward. For a single 5-gallon DWC bucket, a basic dual-outlet aquarium pump works fine. For larger RDWC setups, you want more airflow than you think you need. I run my air pumps at roughly 1 watt per gallon of reservoir volume as a baseline. Dissolved oxygen is that important.
Growing medium choice depends on your system. For DWC, hydroton clay pebbles are standard because they’re pH-neutral, reusable, and support the net pot well. For ebb and flow, hydroton or rockwool cubes both work well. For NFT, you often skip medium entirely and just use net pots with a small rockwool starter cube from propagation.
The indoor growing setup guide goes deep on lighting and ventilation choices that apply equally to hydro and soil grows. Getting your environment right is just as important as getting your nutrient solution right.
Hydroponic Nutrient Basics: What Your Plants Actually Need
Cannabis in hydroponics requires three macronutrients (nitrogen, phosphorus, potassium), three secondary nutrients (calcium, magnesium, sulfur), and a range of micronutrients including iron, manganese, zinc, and boron. In hydro, all of these must be supplied in the nutrient solution because there is no organic matter in the growing medium to provide them.
The ratio of these nutrients changes dramatically between vegetative growth and flowering. During veg, plants want high nitrogen to build leaves and stems. As you flip to flower, nitrogen drops and phosphorus and potassium rise to support bud development and resin production. This isn’t optional; getting the ratio wrong is one of the most common reasons hydro grows underperform.
EC and TDS: Measuring Nutrient Concentration
Electrical Conductivity (EC) measures the total dissolved solids in your nutrient solution, which gives you a proxy for nutrient concentration. TDS (total dissolved solids) is the same measurement expressed in parts per million (ppm) rather than millisiemens per centimeter (mS/cm). Most nutrient brands give you target EC ranges on their feeding charts.
As a general baseline from my own grows, seedlings and clones want EC around 0.4-0.6 mS/cm. Early veg runs 0.8-1.2. Late veg and early flower bumps to 1.2-1.8. Peak flower can go 1.8-2.2 for hungry strains. These are starting points, not absolutes. Watch your plants. If leaves are showing tip burn, you’re feeding too hot. If they’re yellowing between the veins, you’re likely deficient.
pH in Hydroponics: The Non-Negotiable
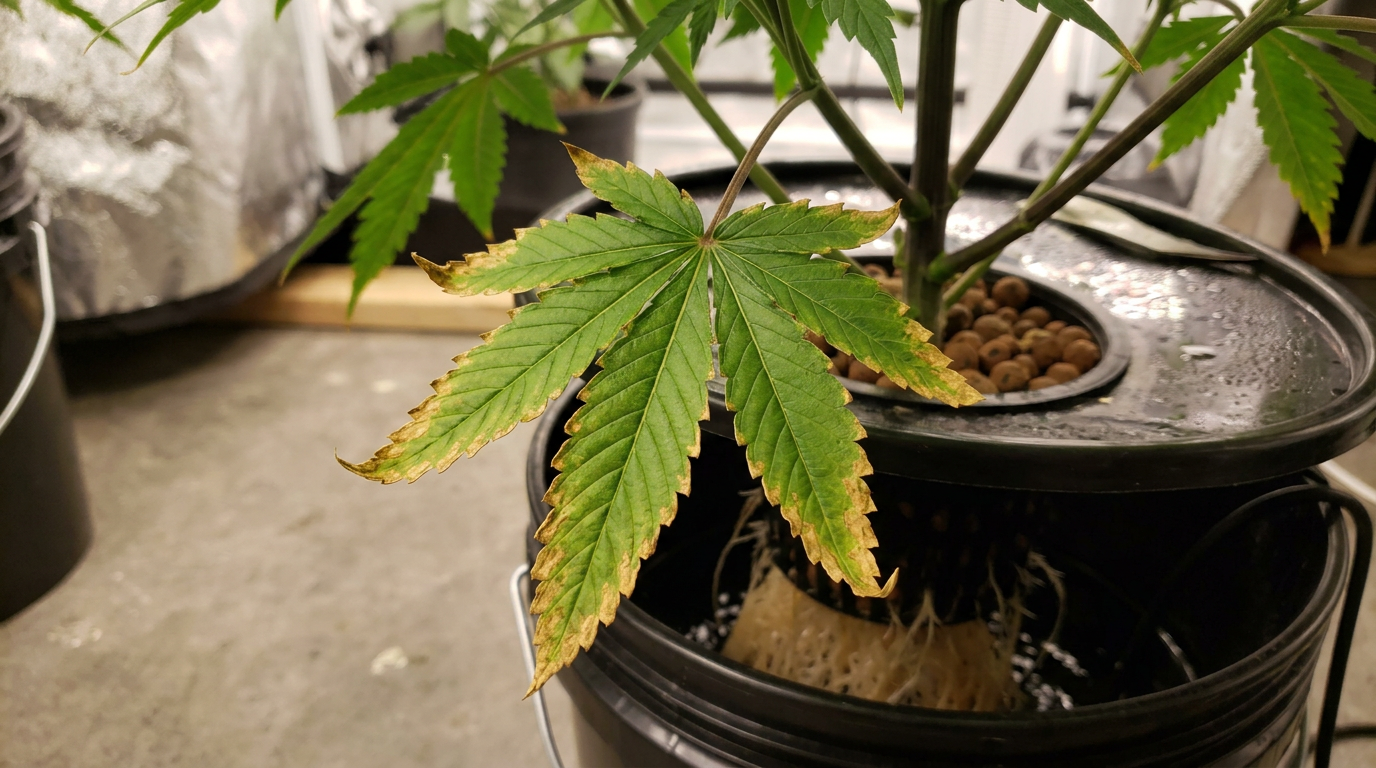
Nutrient availability in hydroponics is almost entirely pH-dependent. Even if your EC is perfect, a pH outside the optimal range locks out specific nutrients and creates deficiency symptoms that look like something else entirely. This is why so many hydro growers chase deficiencies with more nutrients when the real fix is adjusting pH.
For hydroponic cannabis, maintain pH between 5.5 and 6.2, with 5.8 being the sweet spot most experienced growers target. Some growers deliberately “pH drift” their reservoir between 5.5 and 6.2 across a week to ensure different nutrient uptake windows stay open. I’ve done this for years and it genuinely helps prevent lockout.
Calcium and Magnesium: The Hydro Grower’s Best Friends
Cal-Mag deficiency is probably the most common issue I see in hydro grows, especially from growers using reverse osmosis (RO) water. RO water strips out everything, including the baseline calcium and magnesium that tap water naturally contains. If you’re running RO, you need to supplement Cal-Mag separately, almost every single feeding.
Calcium and magnesium also compete for uptake at similar molecular sizes, so the ratio matters. Most dedicated Cal-Mag supplements are formulated with roughly a 3:1 calcium-to-magnesium ratio, which works well for cannabis. I add Cal-Mag first when mixing nutrients, before any other components, to avoid precipitation.
Hydroponic Cannabis Nutrient Schedule: Week by Week
A complete hydroponic cannabis nutrient schedule runs from germination through harvest flush, typically spanning 12-20 weeks depending on whether you’re growing photoperiod or autoflower genetics. The schedule divides into four phases: seedling, vegetative, flowering, and flush, each with distinct nutrient ratios and EC targets.
Autoflowering strains compress this timeline significantly. A fast autoflower like a Northern Lights auto can go from seed to harvest in as little as 8-9 weeks total. You won’t have a traditional veg flip, so the nutrient schedule telescopes: seedling phase runs 2 weeks, veg runs 2-3 weeks, then flower takes over for the remaining 4-5 weeks. Keep EC on the lower end throughout since autos are generally more sensitive to nutrient stress than photoperiods.
Maya Chen digs into the plant science behind nutrient timing and how different growth phases correspond to hormonal shifts in the plant, which is worth understanding if you want to get the most out of your feeding schedule.
VPD and Environmental Control in Hydroponic Grows
Vapor Pressure Deficit (VPD) is the relationship between air temperature, leaf temperature, and relative humidity that determines how efficiently a cannabis plant transpires and takes up water and nutrients. In a hydroponic system, getting VPD right is especially important because your plants are already primed for rapid uptake; the environment needs to match that pace.
Target VPD of 0.8-1.0 kPa during vegetative growth and 1.0-1.5 kPa during flowering. Low VPD (high humidity, cool temps) slows transpiration and nutrient uptake. High VPD (low humidity, hot temps) stresses the plant and can cause tip burn even when your nutrient solution is perfectly formulated. I’ve seen growers blame nutrient toxicity for what was actually a VPD problem. The complete VPD guide breaks this down with actual charts if you want to dial it in precisely.
In my Denver grow room, dry winters make low humidity less of a problem, but the high altitude means I have to be more careful about CO2 levels than growers at sea level. If you’re in a similar high-altitude state, keep that in mind when dialing in your environment. CO2 supplementation can push yields further in a sealed hydro room, but it’s an advanced step that requires tight environmental control first.
Temperature differentials between lights-on and lights-off also matter more in hydro than in soil. A large swing (more than 15°F) can stress plants and cause nutrient uptake irregularities. I keep my lights-off temps within 10°F of lights-on temps during flowering. This is easier to manage in a well-insulated grow tent than in an open room.
Step-by-Step: Setting Up Your First DWC System
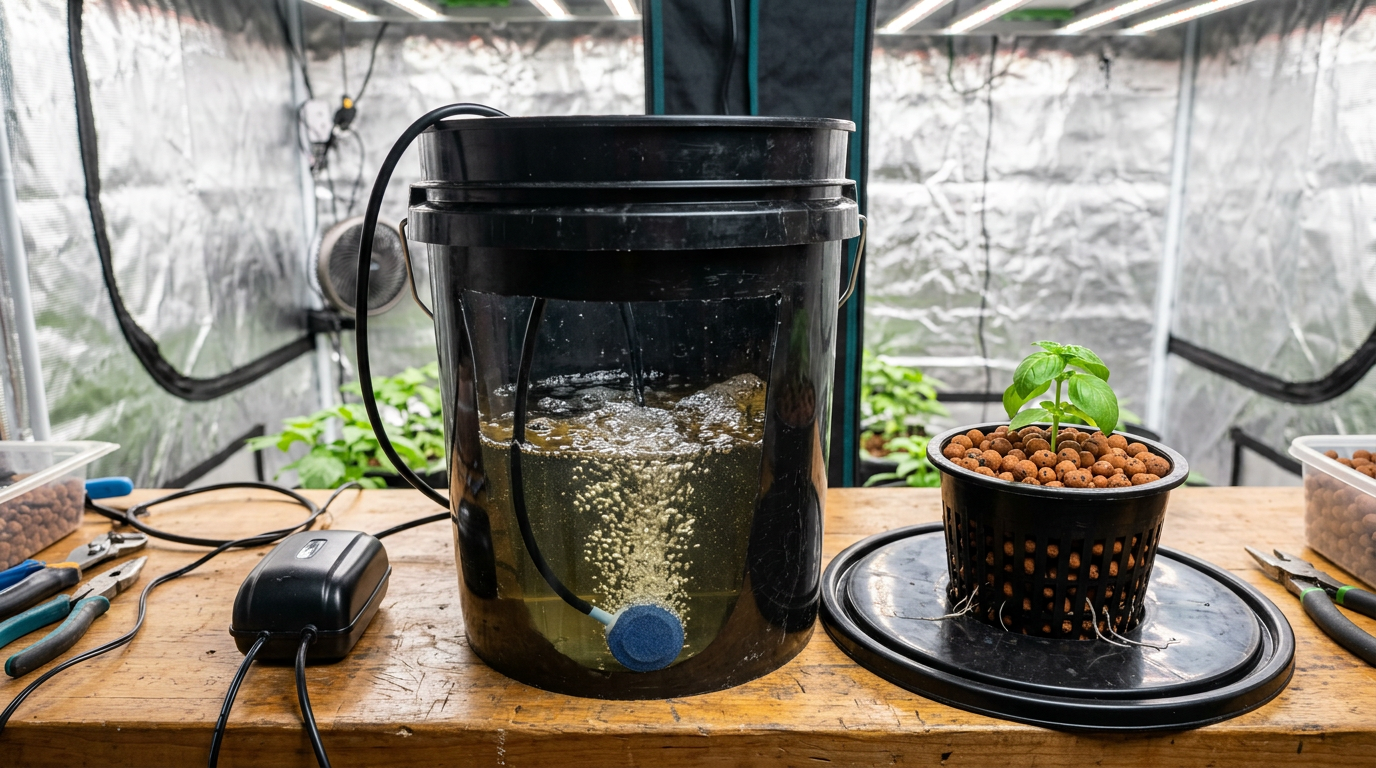
Building a basic DWC setup for one to four plants requires a 5-gallon bucket per plant, net pots sized to fit the bucket lid, an air pump, air tubing, air stones, hydroton growing medium, and a starter nutrient kit. The entire setup can be assembled in a few hours and costs $50-$150 depending on whether you source components individually or buy a kit.
Step one is preparing your buckets. Drill or cut a hole in the center of each lid sized to your net pot (usually 3-inch or 6-inch). The net pot should sit snugly without falling through. Paint or wrap your buckets in something opaque if they’re not already light-proof. Algae grows fast in nutrient solution under light, and once it starts, it’s a pain to eliminate.
Step two is setting up your air system. Run airline tubing from your pump to the air stone inside each bucket. The air stone should sit on the bottom of the bucket. Run the pump continuously; roots need oxygen around the clock. I zip-tie my air lines along the bucket handles to keep things tidy and prevent kinks.
Step three is mixing your first reservoir. Start with your water source. If you’re on municipal tap water in a city like Denver, Chicago, or Los Angeles, test your baseline pH and EC before adding anything. Most tap water in US cities runs 7.0-8.0 pH and 0.2-0.6 EC. You’ll need to bring pH down significantly. Add nutrients in this order: Cal-Mag first, then your base nutrients (grow, micro, bloom), then any additives. Mix thoroughly after each addition before testing pH. Adjust pH last, after all nutrients are added.
Step four is transplanting your seedling or clone. If starting from seed, germinate in a rockwool cube or rapid rooter first. Once the taproot is visible and the seedling is 1-2 inches tall, place the cube into your net pot and surround it with moistened hydroton. For the first week, your water level should be high enough to touch the bottom of the net pot. After roots emerge and hang into the reservoir, drop the water level to leave a 1-2 inch air gap between the solution surface and the net pot bottom. That gap keeps the upper root zone oxygenated.
Step five is your daily maintenance routine. Check pH and EC every 24 hours for the first few weeks until you understand how your specific setup drifts. Top off with pH-adjusted plain water when levels drop (plants drink more water than nutrients, so EC tends to rise between reservoir changes). Do a full reservoir change every 7-14 days to prevent salt buildup and pathogen accumulation.
If you’re sourcing seeds for your first hydro run, understanding seed types matters. The feminized vs autoflower seed guide lays out which genetics make the most sense for different setups, and for a first hydro grow, feminized photoperiods give you the most control over timing.
Common Hydroponic Weed Mistakes (And How to Fix Them)
The most common hydroponic cannabis mistakes are pH drift, reservoir temperatures above 72°F, overfeeding in early stages, neglecting reservoir changes, and poor canopy management that creates humidity traps in dense foliage. Most of these are preventable with consistent monitoring and a basic maintenance schedule.
pH Drift and Lockout
pH drift is the number one issue I see from newer hydro growers. Your reservoir pH can swing a full point in 24 hours, especially during peak feeding periods when plants are drinking heavily. The fix is checking twice daily during critical growth phases and understanding that pH-up and pH-down solutions are strong; add them in small increments and mix thoroughly before retesting.
Chronic pH lockout looks like nutrient deficiencies that don’t respond to more nutrients. If you’re seeing yellowing, spots, or twisted new growth and your EC looks fine, check your pH history. I keep a simple log book next to my reservoir. It takes 30 seconds to write down pH, EC, and temp each check, and it’s saved me from chasing ghost deficiencies more times than I can count. The leaf diagnosis guide is also incredibly useful for distinguishing pH lockout symptoms from true deficiencies.
Root Rot
Root rot (Pythium) is the DWC grower’s specific nightmare. It presents as slimy, brown roots with a foul smell. Healthy roots should be white and firm. The primary causes are reservoir temperatures above 72°F and insufficient dissolved oxygen. Prevention is better than treatment: keep temps down, run plenty of air, change your reservoir regularly, and consider adding beneficial bacteria like Hydroguard (Bacillus amyloliquefaciens) as a preventive measure. I add it to every reservoir I run, no exceptions.
Overfeeding Seedlings
New growers almost always overfeed in the early stages. Seedlings have tiny root systems and can’t handle even moderate EC levels. I’ve seen people start seedlings at 1.5 EC and wonder why they’re getting nutrient burn within days. Start at 0.4-0.6 and work up gradually as the plant sizes up. Plants tell you when they’re ready for more food. Healthy, deep green leaves and vigorous new growth are the signals to bump EC.
Neglecting Canopy Management
Hydro plants grow fast. Really fast. Without proper canopy management, you end up with a tall, uneven plant with a dense lower section that traps humidity and invites mold. Techniques like low-stress training (LST), topping, and screen of green (SCROG) are even more valuable in hydro than in soil because the growth rate is so aggressive. Travis Cole has written extensively about training techniques that translate well from outdoor to indoor environments, including hydro setups where keeping the canopy even is especially important.
The super cropping guide is worth reading before your first hydro run. Super cropping is particularly effective in hydro because the rapid growth rate means plants recover from the stress quickly and the resulting knuckles and lateral branching can dramatically improve your canopy evenness.
Best Strains for Hydroponic Growing
The best strains for hydroponic cultivation are those with efficient nutrient uptake, manageable stretch during flower transition, and genetic stability that holds up under the tighter environmental margins of a soilless system. Sativa-dominant strains can be challenging in small hydro setups due to extreme stretch, while many indica-leaning hybrids thrive in the controlled conditions hydro provides.
Blue Dream is one of my all-time favorites for DWC. It’s a sativa-dominant hybrid that responds beautifully to the accelerated growth hydro provides, and the terpene expression in hydro is noticeably cleaner than in soil in my experience. The terps are brighter, the citrus notes pop more, and the yield is consistently impressive.
OG Kush is a classic hydro strain for good reason. It stays compact enough to manage in a tent, feeds aggressively during peak flower, and produces dense, resinous buds with excellent trichome coverage when EC is kept in the upper range during weeks 10-13. I’ve run OG Kush in DWC probably a dozen times and it never disappoints.
Green Crack is another standout. Its myrcene-dominant profile comes through intensely in hydro, and the sativa growth structure responds well to SCROG training. The fast flowering time (around 7-8 weeks) makes it a good choice for growers who want to run multiple cycles per year.
Northern Lights is probably the most beginner-friendly hydro strain I’ve grown. It’s compact, resilient, forgiving of minor pH swings, and finishes reliably around 8 weeks. For a first hydro run, I’d put Northern Lights at the top of the list. White Widow is another excellent option for beginners, with similar resilience and a slightly more complex terpene profile.
For growers who want to push yield in a SCROG setup, Gorilla Glue and Sour Diesel are both exceptional. Gorilla Glue produces some of the most resin-covered buds I’ve ever pulled out of a DWC system. Sour Diesel stretches significantly during transition, so plan your plant height accordingly, but the flavor and potency in hydro is hard to match.
If you want to explore the full range of strain options and match genetics to your specific goals, the best cannabis strains guide covers dozens of options with grower difficulty ratings that apply directly to hydro cultivation.
Hydroponic Weed vs Soil: Which Grows Better Cannabis?
Hydroponic cannabis generally produces higher yields and faster growth than soil, while soil-grown cannabis is often credited with more complex terpene profiles and greater forgiveness for beginner growers. Both methods can produce exceptional cannabis; the right choice depends on your goals, experience level, and how much time you can dedicate to daily maintenance.
The yield advantage of hydro is real and well-documented. A 2020 review in the journal Agronomy comparing hydroponic and soil cultivation of various crops consistently found yield advantages of 20-40% in hydroponic systems, driven primarily by faster growth rates and more efficient nutrient delivery. Cannabis-specific data from licensed producers in states like Colorado and Oregon echoes these numbers.
The “soil tastes better” debate is more complicated. In my experience, poorly managed hydro can produce flat-tasting cannabis because growers skip the flush or run EC too high for too long, leaving residual salts in the tissue. Well-managed hydro with a proper flush produces cannabis that’s just as flavorful as soil. The difference people taste is usually technique, not medium.
Coco coir sits somewhere between the two. It’s technically a soilless medium that’s usually grown hydroponically (hand-watered to runoff with nutrient solution), but it has some of the buffering characteristics of soil. Many experienced growers consider coco the best of both worlds: faster than soil, more forgiving than DWC, and excellent terpene expression. If pure DWC feels intimidating, coco is a natural stepping stone.
Flushing Hydroponic Cannabis Before Harvest
Flushing is the practice of running plain water (or a very low EC solution) through your system for the final 7-14 days before harvest to clear accumulated nutrient salts from plant tissue. In hydroponics, flushing is straightforward: drain your reservoir, refill with plain pH-adjusted water, and maintain that for the final stretch.
The science on flushing is still debated. A 2019 study published through Colorado State University found that flushing did not significantly reduce mineral content in harvested cannabis flower, though grower communities continue to report improved smoothness and flavor in flushed crops. My personal experience supports flushing, even if the mechanism isn’t fully understood. I’ve done side-by-side comparisons on the same strain and consistently preferred the flushed version in terms of smoke quality.
During the flush, watch your plants for signs of nitrogen deficiency (lower leaves yellowing and dropping). That’s actually what you want. A natural fade before harvest indicates the plant is mobilizing stored nutrients out of its leaves, which is a sign the flush is working. Knowing exactly when to pull your plants is covered in detail in the harvest timing guide, which includes trichome charts that work regardless of whether you’re growing hydro or soil.
Legal Considerations for Home Hydroponic Cannabis Grows in the US
Home cannabis cultivation is legal for adults in 24 US states as of 2026, with plant limits typically ranging from 2-6 plants per person or per household. States including Colorado, California, Oregon, Michigan, and Illinois allow home grows, while states like Texas, Florida, and Georgia do not permit personal cultivation regardless of possession laws. Always verify your specific state and local ordinances before setting up any grow.
Hydroponic equipment itself is entirely legal to purchase and own in all 50 states. Grow lights, nutrient solutions, pH meters, and reservoirs are sold openly at garden supply stores and online retailers nationwide. The equipment has broad legitimate uses in vegetable and herb cultivation, which is why it’s freely available even in states where cannabis cultivation remains illegal.
If you’re in a legal state and buying seeds online, the complete seed buying guide covers the legal side of seed purchases in detail, including which seedbanks ship reliably to US addresses. Understanding what you’re buying before you build your hydro system saves a lot of headaches.
Advanced Hydroponic Techniques: SCROG, Manifolding, and CO2
Once your basic hydro setup is dialed in and you’ve run at least one successful crop, advanced techniques like screen of green (SCROG), manifolding, and CO2 supplementation can push your yields significantly further. These aren’t beginner moves, but they’re not as complicated as they look once you’ve got the fundamentals solid.
SCROG in Hydroponic Systems
SCROG involves training your plant’s canopy through a horizontal screen to create an even, flat canopy that maximizes light penetration to every bud site. In hydro, where plants grow fast and aggressively, SCROG is especially effective because you can fill a screen quickly without waiting weeks for growth. I typically set my screen 12-16 inches above my net pots and start weaving branches through it during week 3-4 of veg.
The payoff in hydro SCROG is significant. Instead of one dominant cola and a bunch of secondary buds getting less light, you end up with dozens of cola-level bud sites all hitting the same light intensity. The yield optimization guide covers SCROG and other canopy techniques with specific measurements and setup advice.
CO2 Supplementation
CO2 supplementation raises the carbon dioxide concentration in your grow room above the ambient 400 ppm atmospheric level, typically to 1000-1500 ppm. At elevated CO2, cannabis can photosynthesize more efficiently, which translates to faster growth and higher yields when all other environmental factors (light intensity, temperature, VPD) are also optimized.
The catch is that CO2 supplementation only helps when your lights are bright enough to use it. At lower light intensities (under 400 PPFD), plants can’t take advantage of extra CO2. If you’re running a budget LED setup, adding CO2 won’t do much. If you’re running a high-intensity setup at 600-900 PPFD, CO2 can meaningfully boost output. It’s a tool for optimized systems, not a fix for underpowered ones.
The Bottom Line
Hydroponic cannabis growing is one of the most rewarding things you can do as a cultivator. The learning curve is real, and the margin for error is tighter than soil, but the payoff in growth speed, yield, and the satisfaction of understanding exactly what your plant is getting at every moment is genuinely hard to match.
Start with a simple DWC setup. One or two buckets, a basic nutrient line, a reliable pH meter, and a strain known for resilience. Get comfortable with checking your numbers daily. Understand what healthy roots look like. Learn to read your plants before you chase symptoms with more products. That foundation will serve you through every system upgrade and strain experiment you run for years to come.
The growers I’ve seen succeed fastest in hydro are the ones who treat it like a craft, the same way I approached carpentry. Measure twice, cut once. Check your pH before you go to bed. Keep a log. The system rewards discipline in a way that soil doesn’t always force you to develop. Once you’ve run a successful hydro crop, you’ll understand why so many serious growers never go back to soil.
Frequently Asked Questions
Is growing hydro weed hard?
Hydroponic cannabis growing is moderately challenging for beginners but very manageable once you understand the core concepts of pH, EC, and reservoir management. The main difficulty is that hydro systems have less buffering than soil, so mistakes show up faster. Most growers find their first run has a steep learning curve, and by their second or third run they’re comfortable with the daily maintenance routine. Starting with a simple DWC setup and a forgiving strain like Northern Lights or White Widow significantly reduces the difficulty for new growers.
How long does it take for hydroponic weed to grow?
A complete hydroponic cannabis grow from seed to harvest typically takes 10-18 weeks for photoperiod strains, depending on how long you veg before flipping to flower. Autoflowering strains in hydro can finish in as little as 8-10 weeks from seed. The vegetative phase is entirely in your control with photoperiods; most home growers veg for 4-6 weeks before flipping. Flowering typically takes 8-10 weeks for most indica-dominant and hybrid strains, and up to 12+ weeks for longer-flowering sativa-dominant genetics.
How to grow hydroponic plants for beginners?
The best starting point for beginner hydroponic cannabis growers is a single-bucket Deep Water Culture system. Set up one 5-gallon bucket with a net pot lid, air pump, air stone, and hydroton growing medium. Use a two-part or three-part base nutrient system and follow the manufacturer’s feeding chart at half strength for the first two weeks. Check pH and EC daily, targeting 5.8 pH and 0.8-1.0 EC during early veg. Choose a resilient, forgiving strain, keep your reservoir temperature below 70°F, and change your reservoir every 7-10 days. Consistency and observation matter more than expensive equipment.
What is the best hydroponic system for cannabis?
Deep Water Culture (DWC) is the best hydroponic system for most home cannabis growers because it’s affordable to set up, relatively simple to maintain, and produces excellent results. RDWC (Recirculating DWC) is the next step up for growers running multiple plants who want centralized reservoir management. Ebb and flow is a good option for growers who want more forgiveness and flexibility in growing medium choice. NFT is best suited to experienced growers running compact strains in commercial-style setups where water efficiency matters.
Do hydroponic cannabis plants need different nutrients than soil plants?
Yes, hydroponic cannabis requires nutrients specifically formulated for soilless systems. Soil nutrients often contain organic compounds that rely on microbial breakdown in the growing medium, which doesn’t happen in hydro. Hydroponic nutrients are fully water-soluble and immediately bioavailable. You also need to supply calcium and magnesium explicitly in hydro, especially if using reverse osmosis water, because there’s no soil to provide baseline mineral content. Most reputable nutrient brands offer dedicated hydroponic formulations that are pH-stable and designed to work together without precipitating out of solution.
How often should I change my DWC reservoir?
Change your DWC reservoir every 7-14 days as a standard practice. More frequent changes (every 7 days) are better during peak flowering when plants are feeding heavily and salt accumulation is fastest. Between changes, top off with plain pH-adjusted water as the level drops, since plants consume more water than nutrients and EC will naturally rise between changes. A full reservoir change also gives you the opportunity to inspect roots, clean the bucket walls, and reset your nutrient ratios to match the current growth phase.
Can I grow autoflowers in a hydroponic system?
Autoflowering strains grow very well in hydroponic systems, particularly DWC and ebb and flow. The accelerated growth that hydro provides complements the autoflower’s already fast life cycle, and many growers report their best autoflower yields come from DWC setups. The key difference with autos in hydro is keeping EC on the lower end throughout the grow (typically 0.8-1.6 mS/cm maximum) since autoflowers are generally more sensitive to nutrient stress than photoperiod strains. You also won’t have a traditional veg flip, so the nutrient schedule transitions from seedling to early flower around weeks 3-4 based on plant development rather than light schedule.