Your cannabis leaves are talking to you constantly, every curl, spot, yellowing edge, and purple stem is a message from the plant telling you something’s off. After 12 years of running grows in Colorado, I can tell you that the growers who consistently pull heavy, healthy harvests aren’t the ones with the most expensive gear. They’re the ones who learned to read their plants early, before a small issue becomes a crop-ending disaster. Whether you’re dealing with cannabis plant problems in a basement tent in Denver or a licensed facility in Oregon, the diagnostic process is the same: slow down, look closely, and work through a logical sequence before you reach for any bottle of nutrients. This guide is that sequence, a complete cannabis leaf diagnosis framework built from real grow room experience and solid plant science.
- Start Here Every Single Time: pH Is the Most Overlooked Cause of Cannabis Plant Problems
- The Nutrient Deficiency Playbook: What Each Symptom Is Actually Telling You
- Nutrient Toxicity: When Too Much Is Just as Damaging as Too Little
- Diagnosing Cannabis by Growth Stage: Veg vs. Flower Problems Aren’t the Same
- The Three Diseases That Devastate Cannabis Crops, and How to Spot Them Early
- Pest Identification Through Leaf Damage Patterns
- Environmental Stress vs. Disease and Deficiency: Reading the Difference
- Viral and Bacterial Diseases: The Rare but Serious Threats
- Building Your Diagnostic Flowchart: A Systematic Approach to Any Leaf Problem
- Strain-Specific Sensitivity: Why Some Genetics Are Harder to Diagnose
Start Here Every Single Time: pH Is the Most Overlooked Cause of Cannabis Plant Problems
pH lockout is more common than true nutrient deficiencies, and every experienced grower I know will tell you the same thing, check your pH before you do anything else. This isn’t just Reddit wisdom, it’s fundamental plant physiology. Cannabis roots can only absorb specific nutrients within specific pH windows. When your root zone pH drifts out of that range, nutrients that are physically present in your medium become chemically unavailable to the plant. The result looks exactly like a deficiency, because functionally it is one, even though your feed solution is perfectly balanced.
For soil grows, I target a pH of 6.0–7.0, with the sweet spot sitting around 6.5. In coco or hydro, I run tighter, 5.5–6.5, ideally around 5.8–6.0. If you’re seeing widespread yellowing, red stems, or blotchy discoloration and you haven’t tested your runoff pH in the last few days, that’s your first move. Grab a reliable digital pH pen (not the cheap strips, they’re notoriously inaccurate), water to runoff, and measure what’s coming out of the bottom of your pot. If that number is outside your target range, you’ve found your problem without spending a dime on supplements.
Red stems and leaf discoloration are among the most common signs of pH imbalance in cannabis plants, and I’ve personally chased “phosphorus deficiency” and “cal-mag issues” for days before realizing my pH pen needed calibration. Calibrate your meters weekly. It takes two minutes and it’s saved me more grows than I can count. Once pH is confirmed in range, then, and only then, do you start investigating actual nutrient issues.
The Nutrient Deficiency Playbook: What Each Symptom Is Actually Telling You
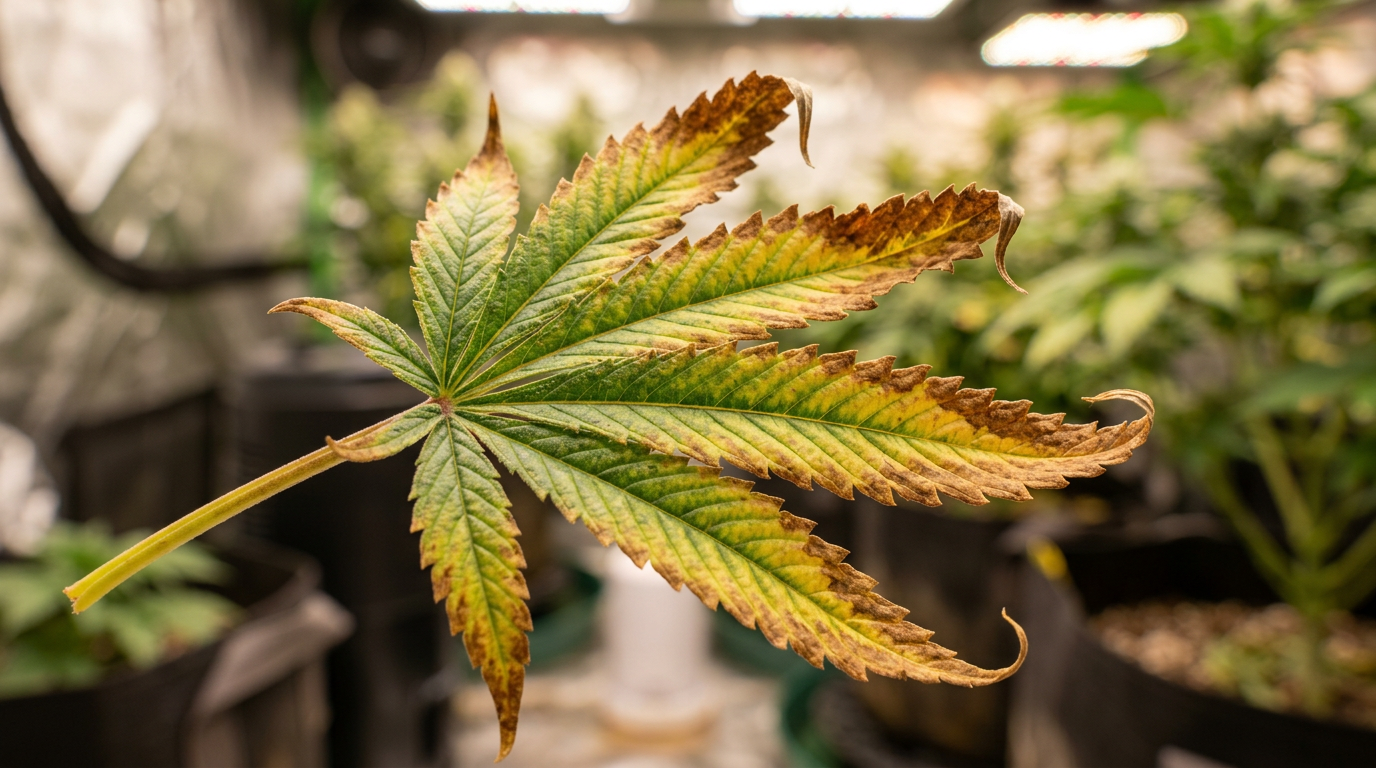
Leaf discoloration is the universal signal of nutrient deficiency in cannabis, but the pattern of that discoloration tells you which specific nutrient is the problem. This is where knowing your mobile versus immobile nutrients becomes a game-changer for diagnosis. Mobile nutrients, nitrogen, phosphorus, potassium, and magnesium, can be relocated by the plant from older growth to newer growth when supplies run low. That means deficiencies in mobile nutrients show up first on your lower, older fan leaves. Immobile nutrients, calcium, iron, manganese, sulfur, can’t be moved once deposited in leaf tissue, so deficiencies appear first in the newest growth at the top of the canopy.
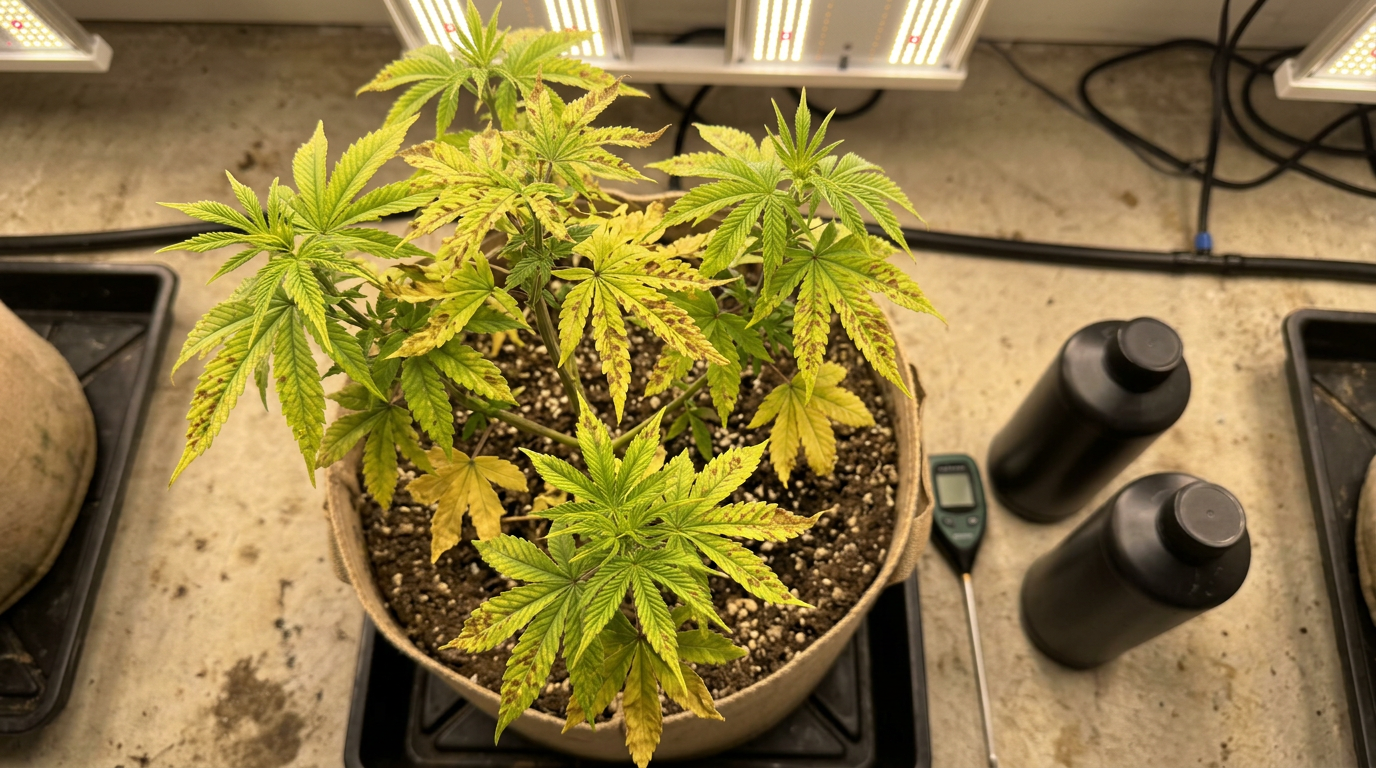
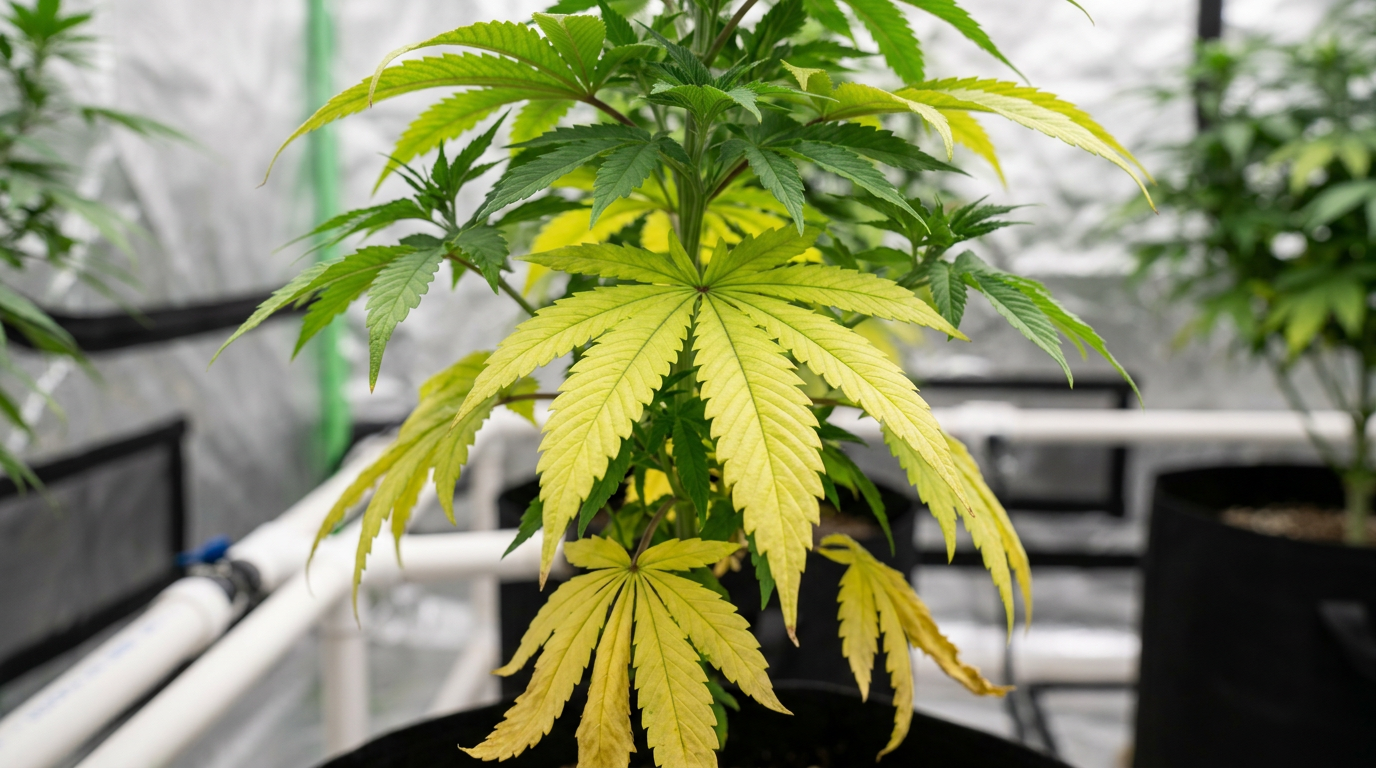
Nitrogen deficiency is probably the most common issue I see in home grows, especially late in veg or early flower when plants are pushing hard. It starts as a general pale green or yellow color on the lowest leaves, gradually working its way up the plant. The yellowing is uniform across the leaf, no spots, no patterns, just a fading of that healthy dark green. If you leave it uncorrected, you’ll see those lower leaves develop brown or black dead spots at the tips and edges before they drop. A lot of growers panic when they see this in late flower and start hammering nitrogen, but some lower leaf yellowing in weeks 6–8 of flowering is completely natural as the plant pulls nitrogen back from fan leaves to fuel bud development. Context matters enormously.
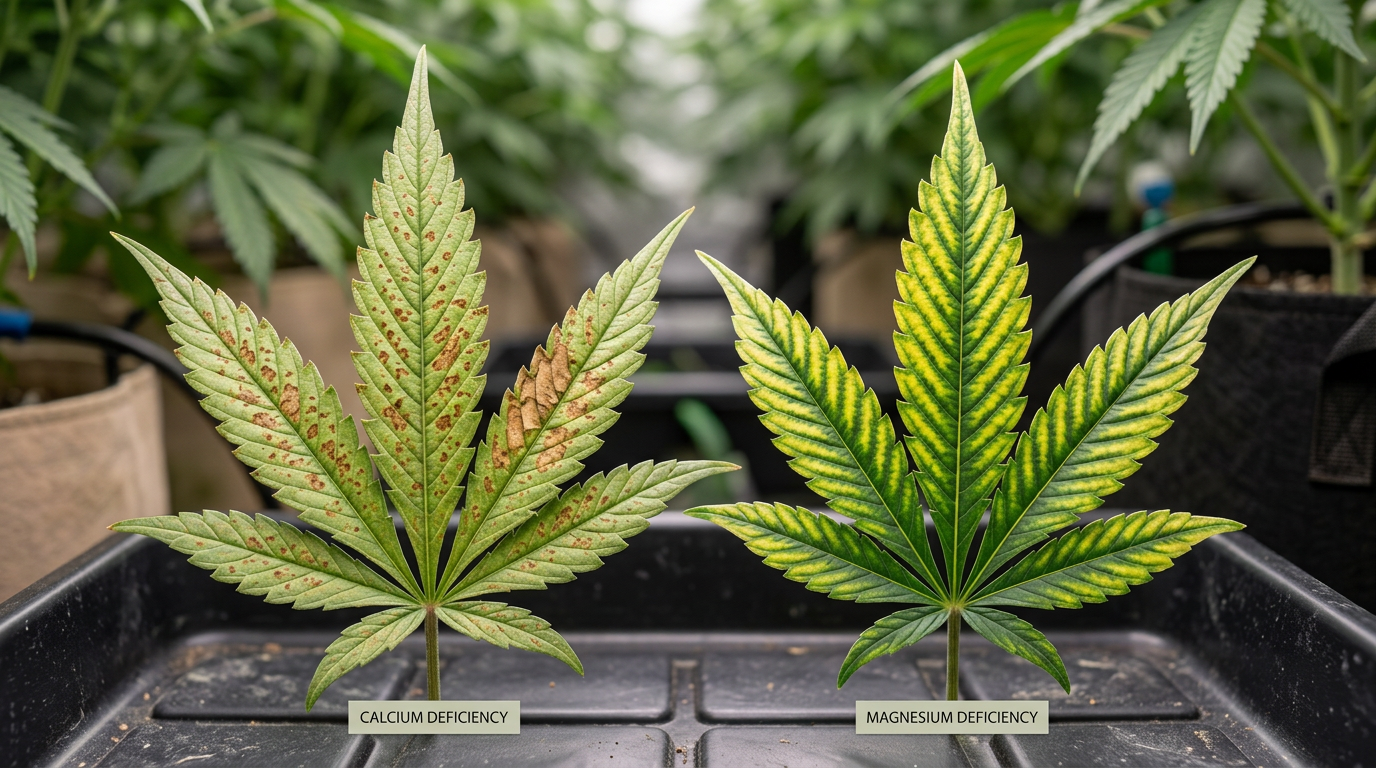
Calcium and magnesium (cal-mag) deficiency is the second most common thing I troubleshoot, especially in RO water grows or coco coir setups where these elements aren’t naturally present. According to Sensi Seeds, cal-mag deficiency causes brown or yellow spots that can grow larger and lead to leaf death if uncorrected. The pattern is distinctive: irregular brown or rust-colored spots scattered across the middle of the leaf blade, not just at the edges. Calcium deficiency specifically tends to affect new growth, you’ll see the tips of young leaves cupping and crinkling, sometimes with brown edges on the newest leaves. Magnesium deficiency shows as interveinal chlorosis on older leaves, the leaf veins stay green while the tissue between them turns yellow. It’s a striking visual once you know what you’re looking at.
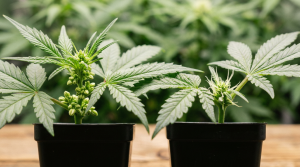
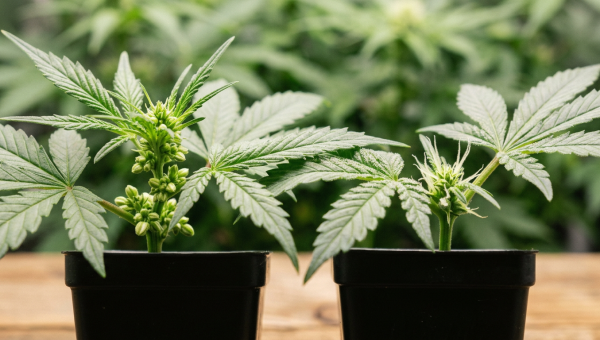
Phosphorus deficiency typically manifests as a darkening or purpling of leaves and stems, particularly on the underside of fan leaves. This is different from the natural purpling you see in some genetics, strain-related purpling tends to be uniform and aesthetically clean, while phosphorus-related purpling is patchy and often accompanied by dark blotching. Potassium deficiency shows up as brown, scorched-looking leaf edges and tips, starting on older leaves and progressing inward. It’s easy to confuse with windburn or light stress, which is why checking your environment alongside your nutrient levels matters.
Nutrient Toxicity: When Too Much Is Just as Damaging as Too Little
Nutrient toxicity causes leaf symptoms that are just as damaging as deficiencies, and they’re frequently misdiagnosed as something else entirely. Nitrogen toxicity is the classic beginner mistake, you see those dark, almost black-green leaves that are unnaturally shiny and clawing downward at the tips. Growers often think their plants look “super healthy” because of the deep green color, but that claw, where the leaf tips curl down like a hawk’s talon, is a clear sign you’re overfeeding nitrogen. I’ve seen this pattern destroy flowering potential because plants locked in vegetative growth mode won’t transition cleanly into flower.
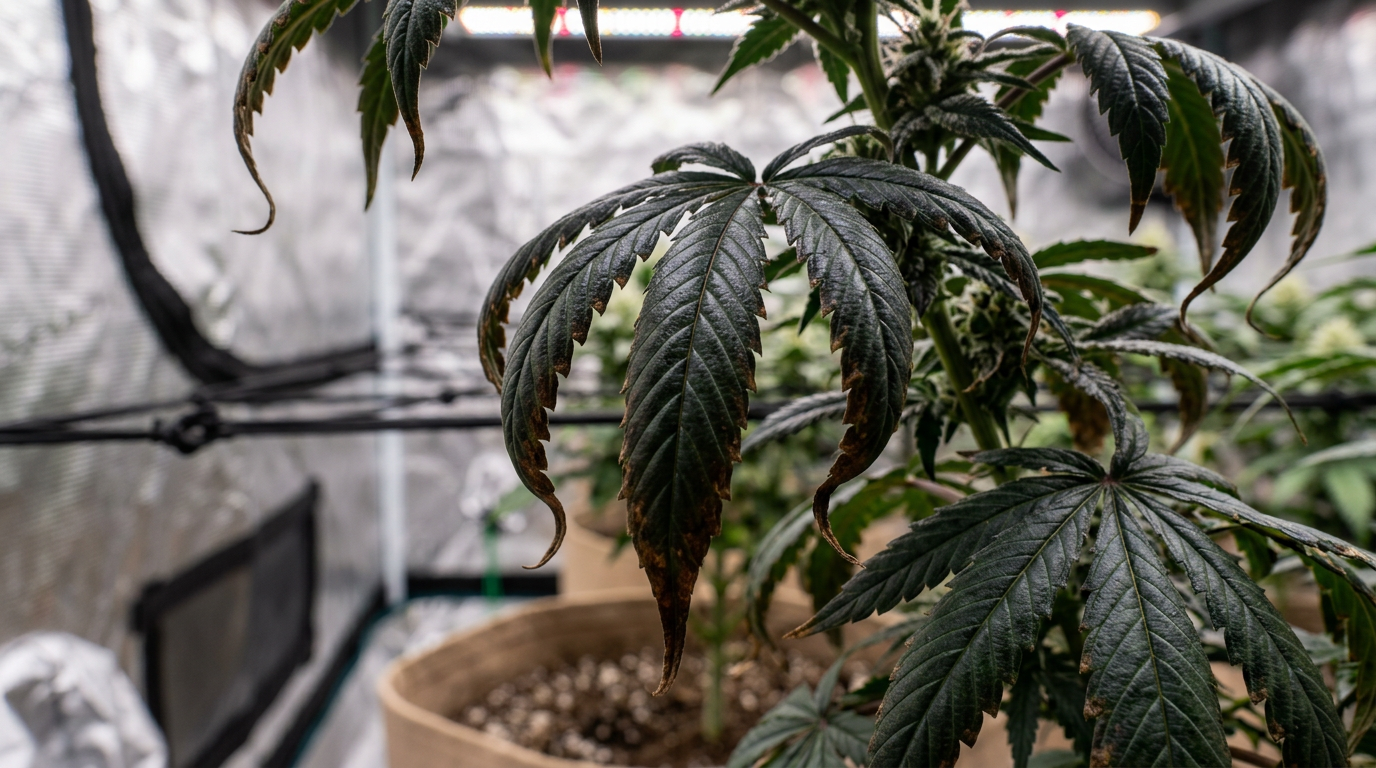
Nutrient burn more generally shows as brown, crispy leaf tips that progress inward as severity increases. Unlike potassium deficiency (which also causes tip burn), nutrient burn typically affects the plant more uniformly across multiple nutrient sites and is accompanied by very high EC readings in your runoff. If your runoff EC is significantly higher than your input EC, salts are building up in your medium and a flush is in order. In legal states like California, Colorado, and Michigan where commercial growers are pushing yield hard, I’ve seen entire rooms get torched by over-feeding schedules that weren’t adjusted for plant size or growth stage.
The side-by-side comparison between deficiency and toxicity is where most growers get tripped up. Nitrogen deficiency = pale, yellowing lower leaves with no clawing. Nitrogen toxicity = dark green, clawing leaves with downward-curling tips. Phosphorus deficiency = purple/dark coloring on undersides of older leaves. Phosphorus toxicity = can cause secondary deficiencies by locking out zinc and iron, showing as yellowing new growth. Understanding this distinction helps you make the right correction instead of accidentally compounding the problem.
Diagnosing Cannabis by Growth Stage: Veg vs. Flower Problems Aren’t the Same
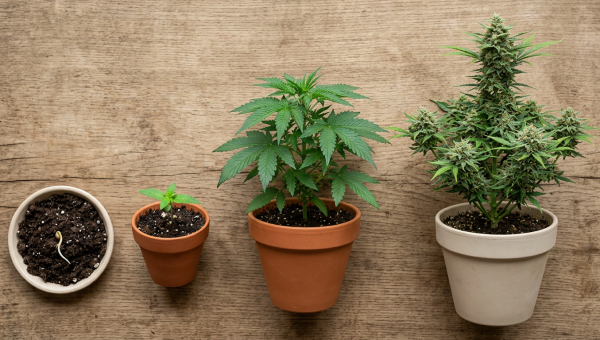
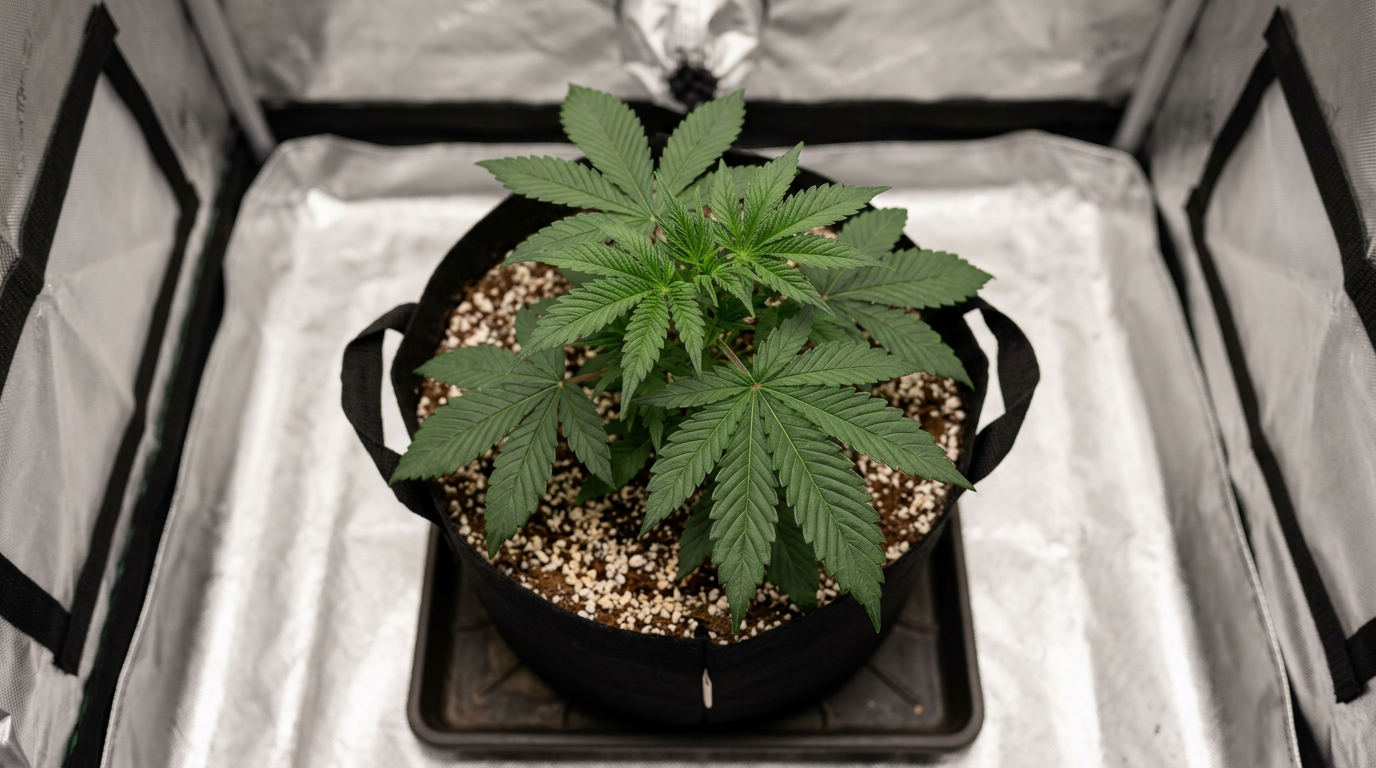
Stage-specific diagnosis is critical because the same symptom in week 2 of veg versus week 6 of flower can mean completely different things and require completely different responses. During vegetative growth, your plant should be producing lush, dark green growth with strong stems and broad fan leaves. Any yellowing, spotting, or stunting during veg is a genuine problem that needs addressing, there’s no natural reason for significant leaf issues at this stage. This is also when you’re most likely to encounter pH and nutrient issues because you’re actively building the root system and establishing feeding patterns.
Early flower (weeks 1–3) is a transition period where the plant is stretching hard and redirecting energy toward bud site development. Some minor lower leaf yellowing is acceptable here as the plant naturally shifts priorities. Mid-flower (weeks 4–6) is your peak nutrient demand window, this is when cal-mag and potassium needs spike significantly, and deficiencies that were borderline in veg become acute. Late flower (weeks 7+) is when strategic defoliation and natural senescence mean some yellowing is expected and even desirable. Flushing in the final 1–2 weeks intentionally depletes nutrients to encourage that natural yellowing, it’s a sign of ripeness, not disease.
One thing I always emphasize to newer growers: cannabis plants infected early with diseases may suffer stunted growth but show no visual signs until weeks into flowering. This is why preventative practices matter as much as reactive diagnosis. By the time you see obvious disease symptoms in flower, you’ve already lost significant yield potential. I run weekly plant inspections starting from week 1 of veg, checking undersides of leaves, monitoring stem color, feeling soil moisture, and tracking growth rate. Anything that deviates from the baseline gets investigated immediately, not next watering.
If you’re just getting started and want to understand the full arc of a healthy grow before problems arise, our complete seed-to-harvest guide lays out what healthy growth looks like at every stage, which makes spotting deviations much easier.
The Three Diseases That Devastate Cannabis Crops, and How to Spot Them Early
Three diseases are especially prevalent in cannabis crops: powdery mildew, Botrytis (gray mold), and Pythium root rot, and catching any of them early is the difference between a manageable setback and a total loss. I’ve dealt with all three over my years growing in Colorado, and each one has a distinct signature that you can learn to recognize before it gets out of hand.
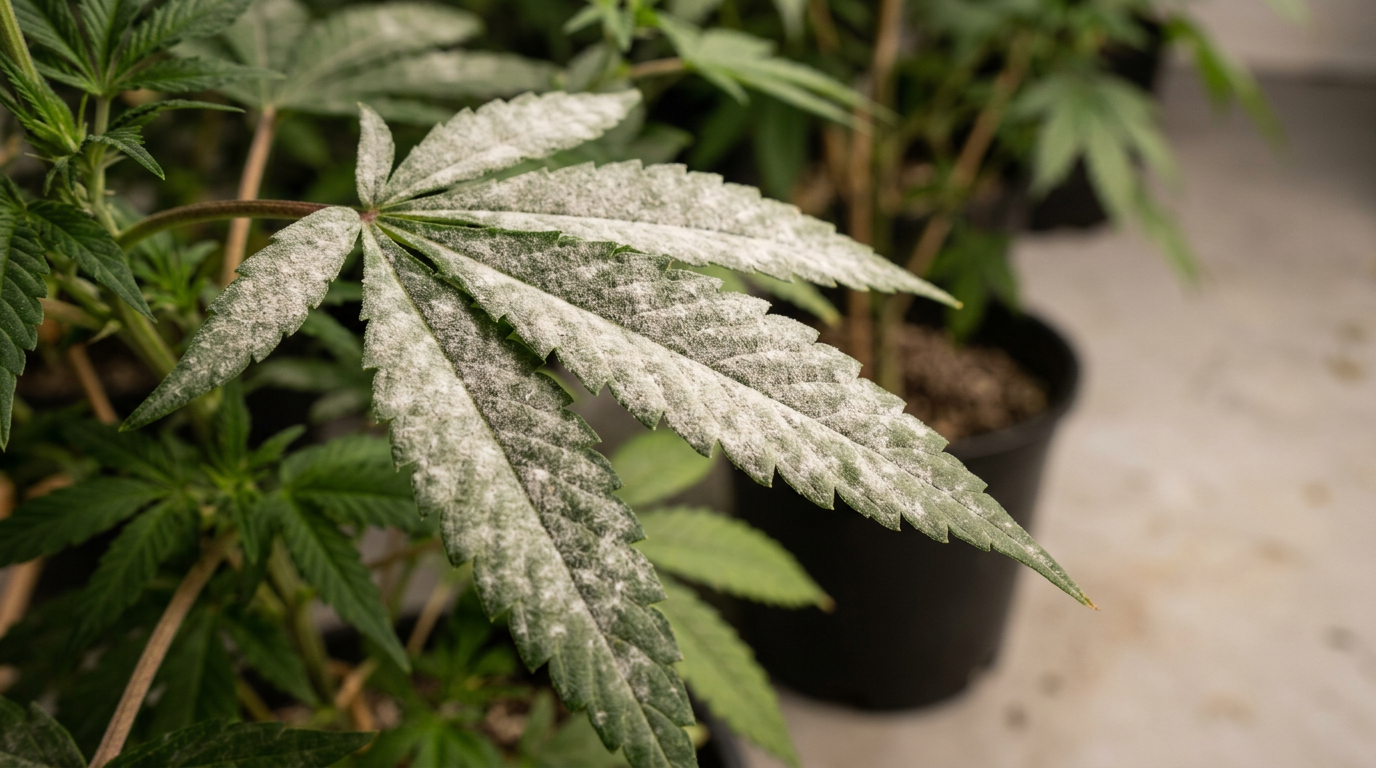
Powdery mildew (PM) is probably the most recognizable cannabis disease. It shows up as white, talcum-powder-like patches on the upper surface of leaves, typically starting on larger fan leaves in the mid-canopy where airflow is poorest. It spreads rapidly in conditions with high humidity (above 60% RH) and moderate temperatures, which is exactly the environment many indoor growers create inadvertently during stretch. PM is a fungal pathogen that can spread via air currents, so one infected plant can contaminate an entire room within days. I’ve seen Colorado outdoor growers lose entire crops to PM in late September when the nights get cool and damp, it’s a real seasonal threat in the Rocky Mountain region.

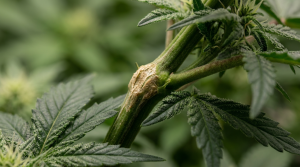
Botrytis, or gray mold, is the nightmare of flowering rooms everywhere. Unlike PM which sits on leaf surfaces, Botrytis infiltrates dense bud tissue and kills from the inside out. By the time you see the characteristic gray-brown fuzzy mold on bud exteriors, the interior tissue is already dead. The first signs are often a single yellowing or dying leaf emerging from within a dense cola, that’s your warning. Pull that leaf gently; if the stem is brown and mushy at the base where it meets the bud, you’ve got Botrytis. Cut it out immediately, sterilize your scissors, and drop your humidity below 50% RH. According to research published in PMC (National Center for Biotechnology Information), plant pathogens infect cannabis through roots, crown, and foliage, reducing overall crop growth, which underscores why multi-point inspection matters, not just leaf surfaces.
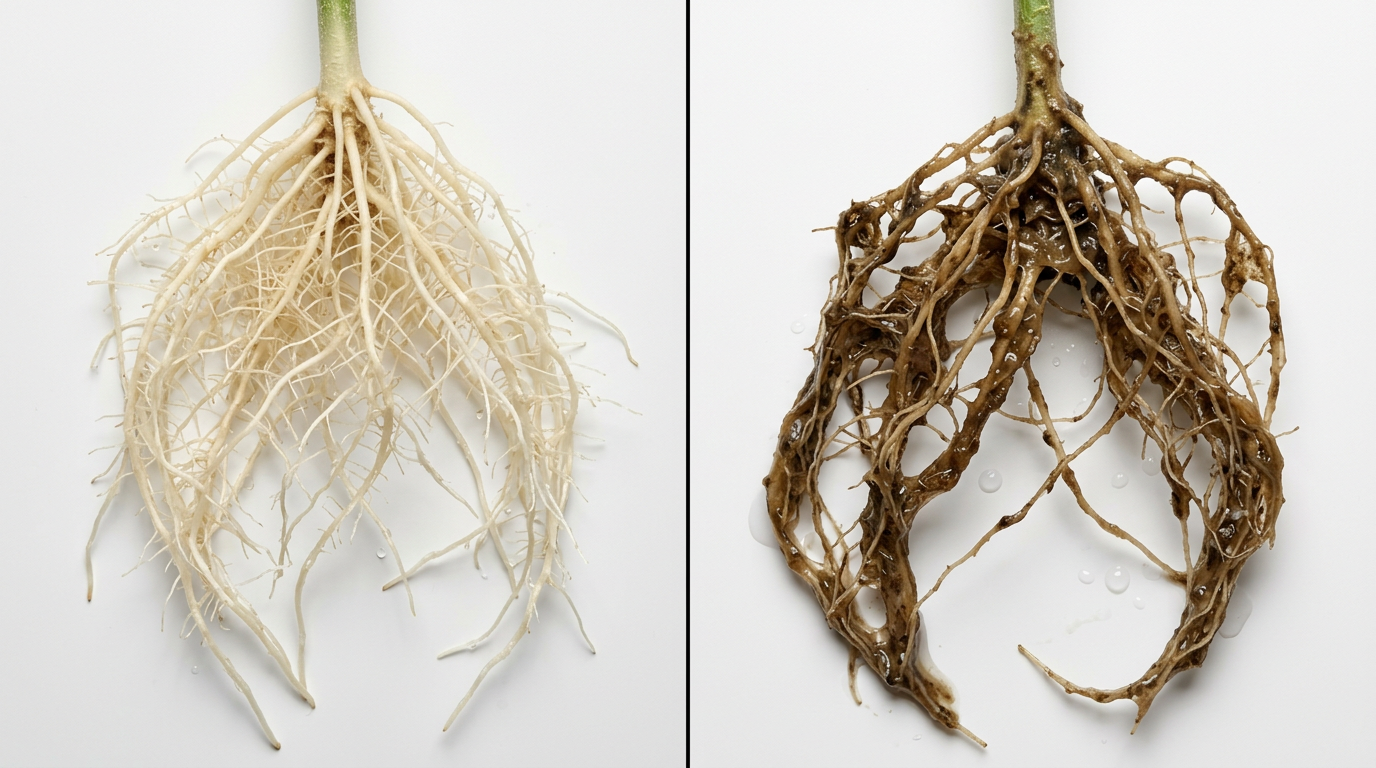
Pythium root rot is the silent killer because it operates entirely underground. The leaf symptoms, wilting despite adequate water, yellowing that doesn’t respond to nutrients, stunted growth, mimic so many other problems that growers often waste weeks chasing the wrong diagnosis. The tell is in the roots themselves: healthy cannabis roots are white and firm. Pythium-infected roots are brown, slimy, and may smell musty or foul. In hydro systems, this can spread through your reservoir and wipe out multiple plants simultaneously. Maintaining proper water temperature (below 72°F/22°C), adequate dissolved oxygen, and beneficial microbes in your root zone are your best preventative tools.
The University of Florida IFAS extension notes in their field guide to hemp diseases that foliar stress symptoms such as leaf scorching or stunting may be noticed as disease severity increases due to a compromised root and/or vascular system, which is exactly why root health inspection should be part of your diagnostic process when leaf symptoms don’t match any obvious nutrient or environmental cause.
Pest Identification Through Leaf Damage Patterns
Tiny spots or webbing on your leaves means you have a bug infestation, and the specific damage pattern tells you exactly which pest you’re dealing with. This matters because spider mites, aphids, whiteflies, fungus gnats, and thrips all require different treatment approaches, spraying the wrong product wastes time and can stress your plants further during a critical growth window.
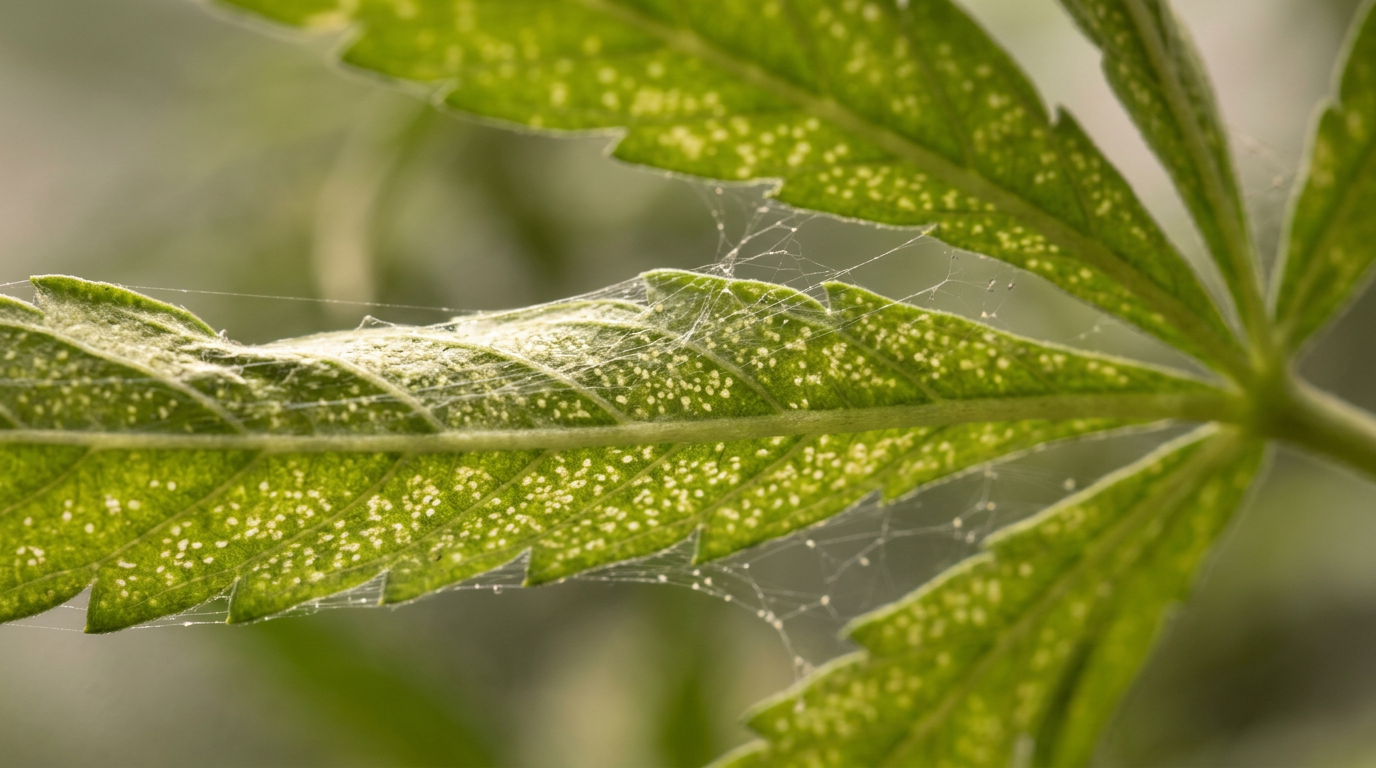
Spider mites are the most common indoor cannabis pest I deal with, especially in dry climates like Colorado where indoor humidity can drop significantly in winter. They’re tiny, barely visible to the naked eye, and they live on the undersides of leaves where they pierce individual cells and suck out the contents. The damage shows up as tiny, pale yellow or white stippling dots on the upper leaf surface, almost like someone went at it with a very fine pin. As the infestation progresses, you’ll see fine webbing between leaves and stems, and in severe cases the entire canopy can be webbed over. Flip your leaves and look with a jeweler’s loupe or a cheap USB microscope, you’ll see the mites moving around. They thrive in hot, dry conditions (above 80°F, below 40% RH), so dialing in your VPD is one of the best preventative measures you have.
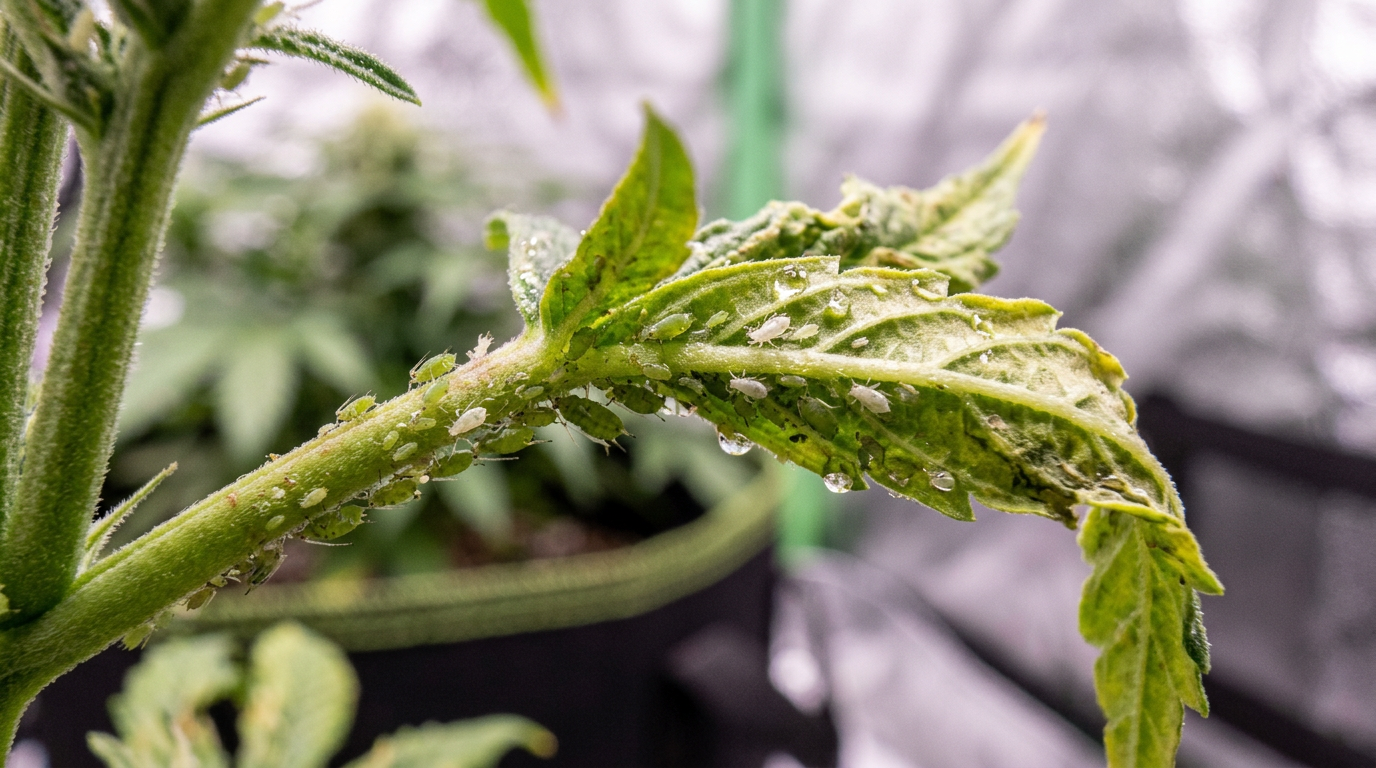
Aphids cluster in colonies, typically on new growth and the undersides of younger leaves. They’re larger than mites, visible to the naked eye as small green, white, or black soft-bodied insects, and they reproduce incredibly fast. Aphid damage shows as curling, distorted new growth and a sticky residue called honeydew on leaf surfaces, which can then attract sooty mold. Thrips leave distinctive silvery streaks or trails on leaf surfaces, they rasp the leaf tissue rather than puncturing it, creating a characteristic shiny, scarred appearance that looks almost like someone dragged a fingernail across the leaf. Fungus gnats, while their larvae damage roots rather than leaves, often signal overwatering, the adults are the obvious symptom (tiny flies hovering around your soil), but the real damage is happening underground.
Maya Chen has done excellent deep-dives into the science of cannabis pest resistance and how terpene profiles like those in Sour Diesel may actually play a role in natural pest deterrence, worth reading if you’re interested in the plant science angle beyond just reactive treatment.
Environmental Stress vs. Disease and Deficiency: Reading the Difference
Environmental stress symptoms, heat stress, light stress, humidity extremes, and wind damage, are frequently misdiagnosed as nutrient deficiencies or disease, and treating the wrong cause will always make things worse. The key differentiator is pattern and distribution: environmental stress tends to affect the plant uniformly or in a pattern that corresponds to the stressor’s location, while nutrient deficiencies follow mobile/immobile patterns and diseases tend to spread from a point of infection outward.
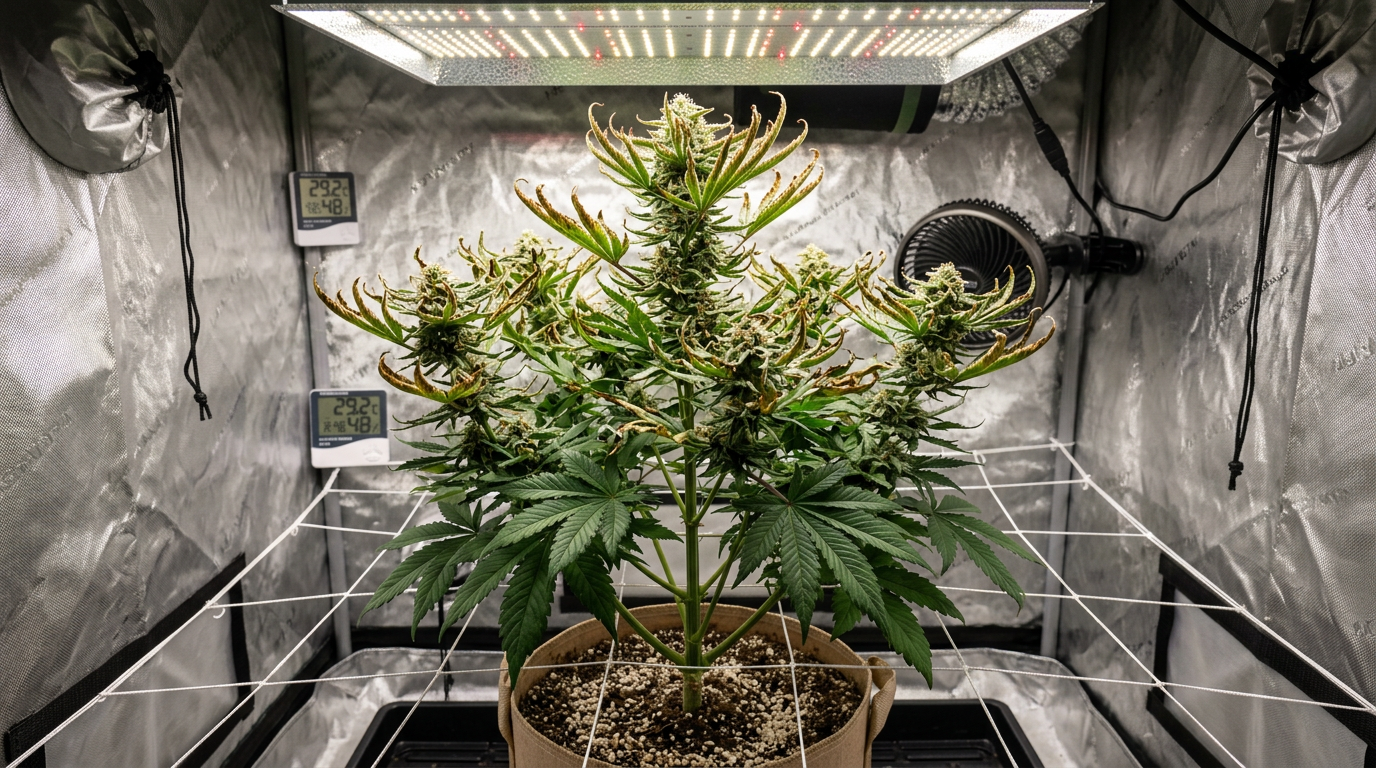
Heat stress shows up as upward leaf curling (taco-ing) on the leaves closest to your light source. The tips and edges may brown and crisp, similar to nutrient burn, but the damage is concentrated in the upper canopy and correlates directly with hot spots under your lights. In my grow room I run a laser thermometer across the canopy regularly, anything above 85°F (29°C) at canopy level is going to cause heat stress regardless of how perfect your nutrient solution is. Light stress from excessive intensity (not just heat) can bleach the uppermost leaves to a pale yellow or even white, this is called light bleaching, and it’s distinct from nutrient-related yellowing because it only affects the tissue closest to the light source.
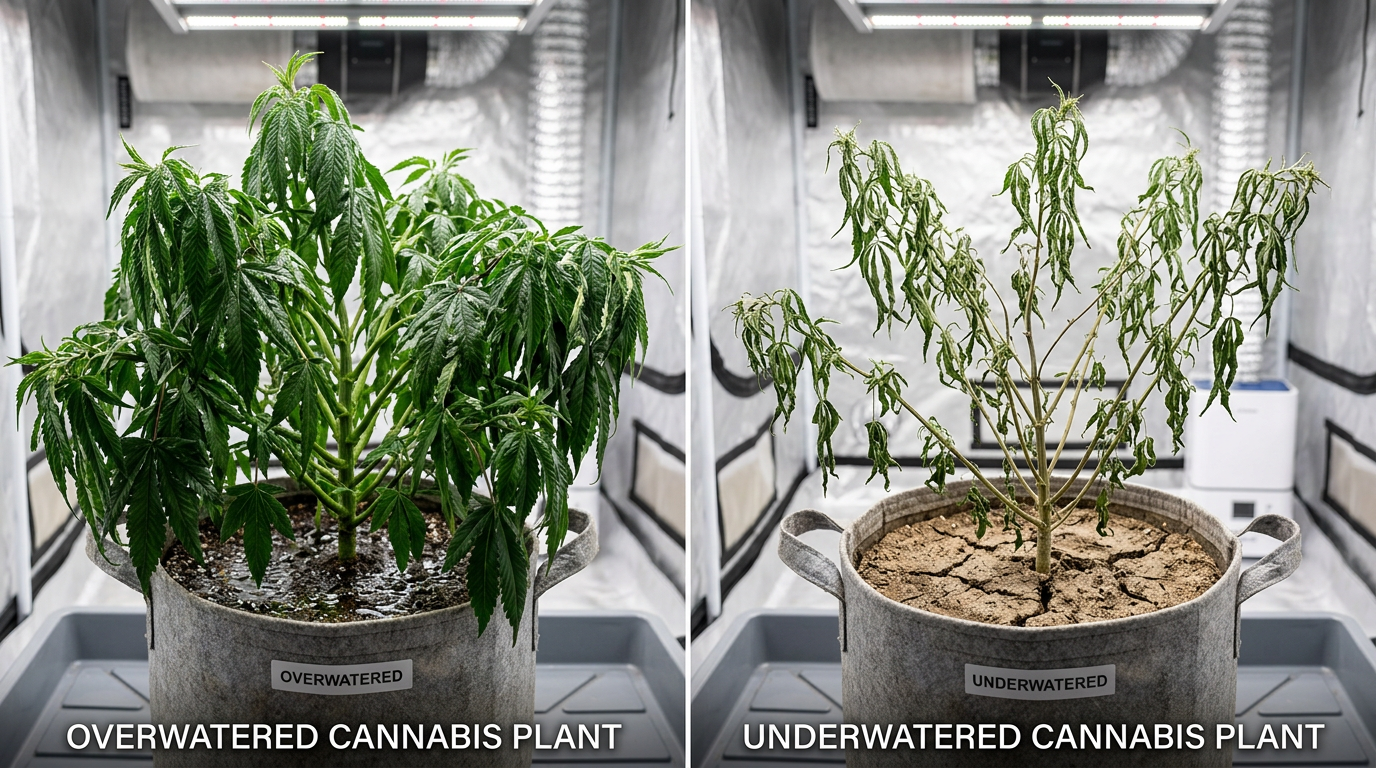
Overwatering is one of the most common environmental stressors I see in new growers, and it produces a very specific symptom set: the entire plant droops with leaves that feel firm and full rather than limp (underwatered plants droop with leaves that feel thin and papery). Overwatered plants have leaves that curl downward all over, not just at the tips, and the soil surface stays wet for extended periods. Chronic overwatering also creates the anaerobic soil conditions that Pythium loves, so it’s a gateway problem that leads to bigger ones. Travis Cole has some great insights on managing moisture in outdoor grows where rainfall is a variable you can’t fully control, worth checking out if you’re running plants outside.
VPD, vapor pressure deficit, is the environmental parameter that ties temperature and humidity together, and getting it wrong creates a cascade of problems that look like disease or deficiency. Too low VPD (high humidity, cool temps) slows transpiration, nutrient uptake, and creates ideal conditions for powdery mildew and Botrytis. Too high VPD (low humidity, high temps) causes excessive transpiration, calcium deficiency symptoms, and heat stress. I target 0.8–1.2 kPa during veg and 1.2–1.6 kPa during flower, these ranges keep the plant’s transpiration stream moving optimally without stressing the tissue.
72-78°F
40-70%
0.8-1.5 kPa
6.0-7.0
5.5-6.5
400-1000 µmol/m²/s
Viral and Bacterial Diseases: The Rare but Serious Threats
Viral cannabis diseases like Beet Curly Top Virus (BCTV) are rare but devastating, and they’re worth knowing about because their symptoms are so unusual that growers frequently misdiagnose them as genetic mutations or severe nutrient problems. BCTV causes leaf yellowing, curling, deformation, stunting, purple veins, and even premature flowering, a cluster of symptoms that doesn’t fit any single nutrient deficiency profile. If you’re seeing multiple bizarre symptoms simultaneously that don’t respond to any conventional treatment, a viral infection should be on your differential. BCTV is transmitted by beet leafhoppers, making it a more common concern for outdoor growers in Western US states, California, Oregon, Nevada, and Colorado, where leafhopper populations are established.
Septoria leaf spot is a fungal disease that causes small, circular spots with yellow halos on fan leaves, typically appearing first on lower foliage during vegetative growth. The spots start pale yellow or white and develop darker brown centers as the lesion matures. According to research from Medicinal Genomics, whose visual chart guide to cannabis diseases is one of the most thorough resources available, proper identification is the foundation of effective disease management. Septoria spreads via water splash, so overhead watering practices dramatically increase risk, another reason I always water at the base of the plant rather than overhead in enclosed grow spaces.
Hop Latent Viroid (HLVd) has become a significant concern in commercial cannabis operations across legal states over the past few years. It causes what growers call “dudding”, plants that grow slowly, produce small, airy buds with dramatically reduced trichome coverage, and generally underperform despite normal-looking leaves. HLVd is transmitted through contaminated tools, so sterilizing scissors and pruning tools between plants with 10% bleach solution or isopropyl alcohol is non-negotiable in any serious grow operation. If you’re running a multi-plant setup and notice one or two plants consistently underperforming despite identical conditions, HLVd should be on your radar.
Building Your Diagnostic Flowchart: A Systematic Approach to Any Leaf Problem
A systematic diagnostic sequence prevents the most common mistake in cannabis troubleshooting, jumping to conclusions and treating the wrong problem. Every time I encounter a leaf issue I don’t immediately recognize, I run through the same mental flowchart before touching anything in the grow room. This process has saved me from over-fertilizing plants that just needed a pH correction, and from wasting time on nutrient adjustments when the real problem was a pest hiding on leaf undersides.
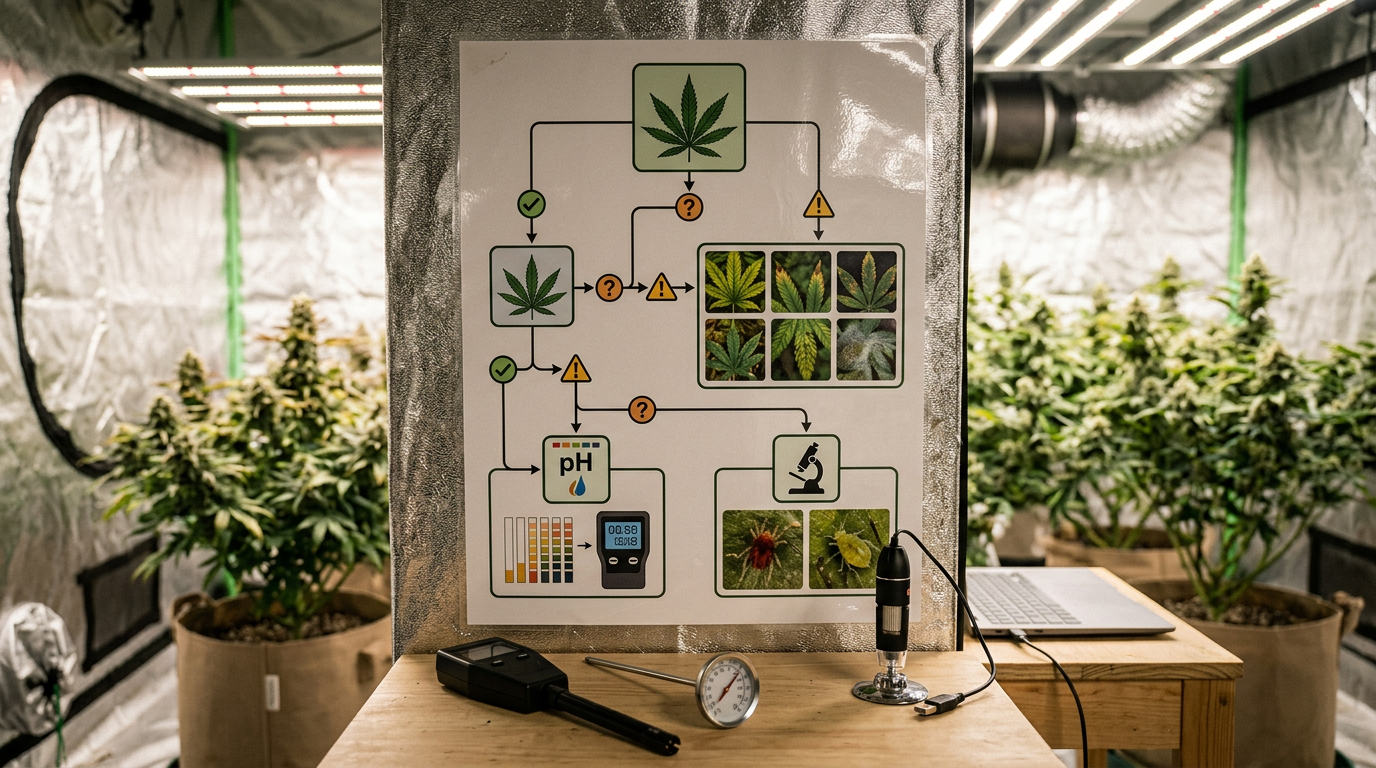
Step one is always environment: confirm your temperature, humidity, VPD, and light distance are within target ranges for your current growth stage. Step two is pH: pull a runoff sample and test it. If pH is out of range, correct it and give the plant 3–5 days before evaluating further. Step three is symptom location: is the problem on old lower leaves (mobile nutrient issue) or new upper growth (immobile nutrient issue or disease)? Step four is pattern analysis: is the discoloration between veins (interveinal chlorosis = magnesium or iron), at leaf edges (potassium or windburn), in spots (cal-mag, disease, or pests), or uniform (nitrogen, light stress)? Step five is the physical inspection: flip every affected leaf and check the underside with magnification for pests. Step six is root inspection if all else fails: check root color and smell.
The recovery timeline matters too, because growers often panic when they don’t see immediate improvement. After correcting a pH issue, you’ll typically see new growth looking healthy within 5–7 days, but existing damaged leaves will not recover, they’ll stay discolored or spotted. That’s normal. You’re looking for new growth to come in clean, not for old leaves to heal. Nutrient deficiency corrections take a similar timeline, 5–10 days to see visible improvement in new growth. Disease treatments require more patience and consistency, often 2–3 weeks of repeated applications before you can assess whether the treatment is working.
The yield optimization guide on our site covers canopy management and environment dialing that directly reduces the stress conditions that make plants vulnerable to the problems we’re discussing here, it’s a natural companion read to this diagnostic guide.
For a broader foundation on setting up your grow space to minimize problems from the start, the indoor growing setup guide is the place to start, getting your environment right from day one dramatically reduces the diagnostic work you’ll need to do later.
You’ll find more articles like this across our cannabis blog, covering everything from seed selection to harvest technique.
Strain-Specific Sensitivity: Why Some Genetics Are Harder to Diagnose
Not all cannabis genetics respond to stress the same way, and knowing your strain’s tendencies helps you calibrate your diagnostic expectations. Some phenos are naturally more nutrient-sensitive than others, what’s a normal feeding rate for Northern Lights might cause visible nutrient burn on a finicky Slurricane pheno. Sativa-dominant genetics like Jack Herer tend to be more tolerant of slightly higher temperatures but more sensitive to pH swings, while indica-heavy strains like Granddaddy Purple can handle cooler temps but are often more susceptible to Botrytis due to their dense bud structure.
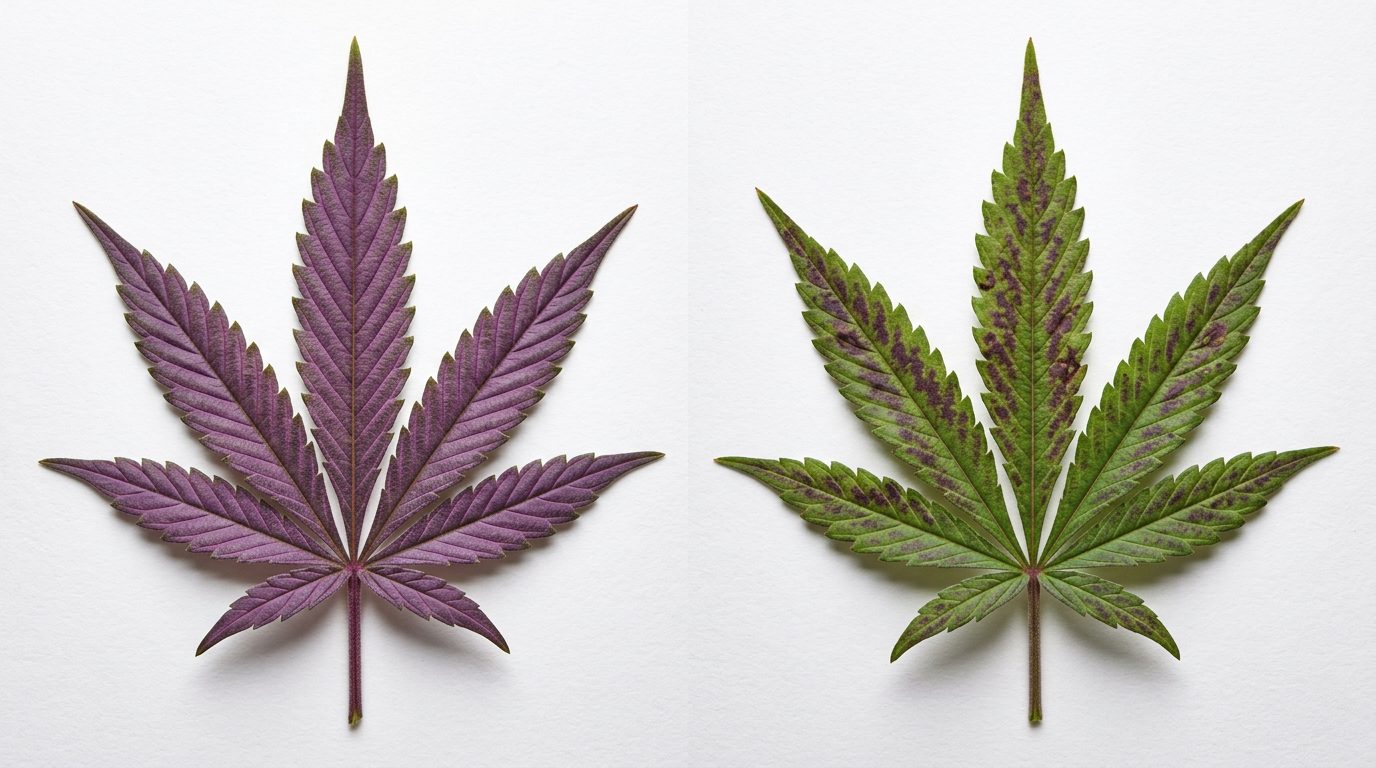
I ran Lemon Cherry Gelato last fall and was initially alarmed by the natural purple coloring that developed in the stems and leaf undersides, it looked like a phosphorus deficiency or pH issue at first glance. But the plant was healthy, pH was perfect, and the coloring was purely genetic expression in response to the cooler nighttime temps I was running. This is where strain knowledge becomes part of your diagnostic toolkit. If you’re running a new pheno you haven’t grown before, research its known sensitivities before assuming any unusual coloring is a problem.
Heavy-yielding strains that push dense canopies, like Gorilla Glue or Wedding Cake, create their own microclimate challenges. Dense foliage reduces airflow to lower bud sites, creating the high-humidity pockets that powdery mildew and Botrytis love. Aggressive defoliation and canopy management aren’t just about light penetration, they’re disease prevention strategies. I always open up the lower third of these plants during the transition to flower to keep air moving through the canopy.
Frequently Asked Questions
What does cal-mag deficiency look like on cannabis leaves?
Cal-mag deficiency produces irregular brown or rust-colored spots scattered across the middle of leaf blades, not just at edges or tips. Calcium deficiency specifically affects new growth first, causing the tips of young leaves to cup, crinkle, and develop brown edges. Magnesium deficiency shows as interveinal chlorosis on older leaves, the leaf veins remain green while the tissue between them turns yellow. According to Sensi Seeds, these brown or yellow spots can grow larger and lead to complete leaf death if left uncorrected. In coco coir or RO water grows, supplementing with a dedicated cal-mag product at 1–5 mL per gallon (adjusted by severity) is the standard correction.
What are the most common leaf problems with marijuana plants?
The most common cannabis leaf problems, in my experience, are nitrogen deficiency (pale yellowing starting on lower leaves), pH lockout (widespread discoloration that doesn’t respond to nutrients), cal-mag deficiency (brown spots on mid-canopy leaves), powdery mildew (white powder on leaf surfaces), spider mite damage (pale stippling dots with webbing on leaf undersides), and heat stress (upward leaf curling in the upper canopy). Most of these issues are preventable with consistent pH monitoring, proper VPD management, and regular plant inspections.
How do I distinguish between pH lockout and an actual nutrient deficiency?
The most reliable way to distinguish pH lockout from a true nutrient deficiency is to test your runoff pH and EC. If your runoff pH is outside the target range (6.0–7.0 for soil, 5.5–6.5 for hydro/coco), correct the pH first and wait 5–7 days before evaluating further. If symptoms persist after pH is confirmed in range, then investigate specific nutrient levels. pH lockout typically produces widespread, multi-nutrient-looking symptoms because multiple elements become unavailable simultaneously, true single-nutrient deficiencies tend to have more specific, pattern-based symptoms. The Reddit growing community consistently emphasizes this: always check pH before adding anything to your grow.
What causes red or purple stems on cannabis plants?
Red or purple stems on cannabis have multiple potential causes, which is what makes them tricky to diagnose. Genetics is the first thing to rule out, many strains naturally develop red or purple coloring in stems, especially in cooler temperatures, and this is completely normal. When stem reddening is a problem, the most common causes are pH imbalance (particularly low pH limiting phosphorus uptake), phosphorus deficiency itself, cold temperatures stressing the plant, or early-stage disease. If the reddening is accompanied by other symptoms like spotted or yellowing leaves, pH should be your first check. If the plant is otherwise healthy and growing vigorously, it’s likely genetic expression.
What does nitrogen deficiency look like in cannabis, and how is it different from natural late-flower yellowing?
Nitrogen deficiency causes uniform pale green to yellow coloring starting on the lowest, oldest fan leaves and progressing upward as severity increases. In serious cases, brown or dead spots develop at leaf tips and edges before the leaf drops. The key distinction from natural late-flower yellowing is timing and progression rate, natural senescence in weeks 7+ of flowering is a slow, gradual process where lower leaves fade gracefully as the plant reallocates nitrogen to buds. Problem nitrogen deficiency in early-to-mid flower progresses rapidly, affects multiple leaf tiers simultaneously, and is accompanied by slowed growth. If you’re in weeks 1–5 of flower and seeing significant yellowing, that’s worth addressing with a light nitrogen feed.
How can I tell if my cannabis plant has a disease like septoria?
Septoria leaf spot produces small, circular spots with distinct yellow halos on fan leaves, typically starting on lower foliage. The spots begin pale yellow or white and develop darker brown centers as they mature, they look like tiny bullseyes on the leaf surface. Septoria spreads via water splash and wet conditions, so it’s more common in outdoor grows or indoor setups with overhead watering. It’s distinguished from cal-mag deficiency spots by the characteristic yellow halo and the more uniform circular shape. If you suspect septoria, remove and dispose of (don’t compost) affected leaves, improve airflow, reduce humidity, and consider a copper-based fungicide as a treatment option.
What are the visual signs of pest infestation on cannabis leaves?
Pest infestations produce specific visual signatures depending on the pest. Spider mites cause tiny pale stippling dots on the upper leaf surface with fine webbing visible on the undersides of leaves in moderate-to-severe infestations. Aphids cluster visibly on new growth and leaf undersides, leaving sticky honeydew residue on leaf surfaces below. Thrips create distinctive silvery, shiny streaks or trails where they’ve rasped the leaf tissue. Whiteflies cause similar stippling to spider mites but the insects themselves are visible as tiny white flies that scatter when disturbed. Fungus gnat larvae damage roots rather than leaves, but the adults, tiny flies hovering around soil, are the obvious surface symptom. Always inspect leaf undersides with magnification as your first pest-check step.